👋 Looking to build a React Native app with ease?
Check out our open-source⭐️Expo/React Native Starter⭐️
– a production-ready solution for your next project! With TypeScript, environment variables, forms handling with validation, i18n, authentication, GitHub Actions, and much more, you’ll have everything you need to get started.
🚀 Don’t miss out – click the link now to learn more!
As I have been building react native apps for a few years now, releasing a new app version to our tester is one of the most recurring tasks and time-consuming when it's done manually.
Having a good automatic process to build and distribute new versions will help you release the app more frequently, make the feedback workflow much easier with your tester, and save you a ton of time to enjoy.
In this article, i will share our approach to configuring react native apps with GitHub action to build and distribute new versions.
We will try to make the workflow as easy as possible to make it easy for everyone coming from a web background to work with( no Fastlane 🤯 or at least no need to deal with it directly)
Why Github action?
Here are some reasons why we are using Github action to build React Native apps:
- Most of our project's code is hosted on Github. So having the build in the same place makes the work easy as we don't have to configure any integrations.
- We love the community behind Github actions as you can find actions for almost every task you need, and mainly we just need to collect the right ones to create more complex workflows.
- Github action provides 2000 free minutes for private repositories in your organization which seem enough for most case if you are going to release a new app every week.
Before starting the build process, i would highly recommend using a releasing process to create a new GitHub release as we will use it to trigger our workflows.
Create a releasing process:
Even if you are working alone on a new project or think your project is simple, you don't want to complicate the process. I would recommend using tags, and GitHub releases to make your work easier and to have more visibility on project progress. Also as the setup is not that complicated and worth the time.
To create a new app release, we will benefit from the javascript ecosystem and use the same tools used by libraries authors to automate creating npm and GitHub releases with changelog.
First, install np and react-native-version
yarn add np react-native-version -D
Go to your project and add the following script to package.json
{
  "name": "AwesomeProject",
  "version": "0.0.1",
  "scripts": {
    "np": "np --no-publish",
    "postversion": "react-native-version"
  }
}
We added react-native-version command as a postversion script because np can't update ios and android versions. react-native-version will help sync package.json version with android and ios as well as increment the build number automatically. The default behavior works as expected, but you can add more options
The last step is to add your GitHub repo URL to your package.json file like the following to help np create a preview release in the correct repo.
"repository": {
   "type": "git",
   "url": "git+https://github.com/username/your-repo.git"
 }
So right now, whenever you feel you need to push a new release, just run:
yarn np
The script will ask you for your next version(patch, minor, major), then the script increment your project version and sync the version with the ios and android project; it will make sure you already pushed all the changes, you are in the right branch, your test passed successfully.

If everything works as expected, the script will open a new tab in your browser to submit your GitHub release 😎

Android workflow
Before starting working on the build workflow, it is recommended to run the build scripts in your machine to make sure it works as expected to prevent debugging issues on the CI.
To make sure your app is ready for the GitHub action build, run the following command to generate APK
cd android && ./gradlew assembleRelease
And this to generate the bundle
cd android && ./gradlew bundleRelease
Usually, the default React Native template comes with debug keys used on release.
Hopefully, the two scripts will run successfully. If it's not the case, make sure to fix all issues before going further.
✔️ Generate your private signing key using keytool:
keytool -genkeypair -v -storetype PKCS12 -keystore my-upload-key.keystore -alias my-key-alias -keyalg RSA -keysize 2048 -validity 10000
This command prompts you for passwords for the Keystore and key and the Distinguished Name fields for your key. It then generates the Keystore as a file called my-upload-key.keystore. keep the Keystore and passwords in a safe place; we will need them next
✔️ Go to .github/workflows/ and create a new github workflow android_build.yml with the following content
name: Android Build ## name of the workflow

on:
  workflow_dispatch: # To trigger manual build
  release:
    types: [published] # only run the workflow when a new release has been published

jobs:
  android-build:
    name: Android Build
    runs-on: ubuntu-latest # using ubuntu latest version / or you can use a specific version

    steps:
      - name: Check out Git repository # clone the repo to local ci workspace
        uses: actions/checkout@v2

      - name: Set up our JDK environment # setup JDK environment: mandatory as we need to build  android project
        uses: actions/setup-[email protected]
        with:
          java-version: 1.8

      - name: Get yarn cache directory path
        id: yarn-cache-dir-path
        run: echo "::set-output name=dir::$(yarn cache dir)"
      - name: Restore node_modules from cache
        uses: actions/cache@v2
        id: yarn-cache
        with:
          path: ${{ steps.yarn-cache-dir-path.outputs.dir }}
          key: ${{ runner.os }}-yarn-${{ hashFiles('**/yarn.lock') }}
          restore-keys: |
            ${{ runner.os }}-yarn-

      - name: Install dependencies # install project deps with --frozen-lockfile to make sure we will have the same packages version ( very recommended  on running yarn install on ci)
        run: yarn install --frozen-lockfile

      ## configure cash for gradle : will help to reduce build time
      - name: Cache Gradle Wrapper
        uses: actions/cache@v2
        with:
          path: ~/.gradle/wrapper
          key: ${{ runner.os }}-gradle-wrapper-${{ hashFiles('gradle/wrapper/gradle-wrapper.properties') }}

      - name: Cache Gradle Dependencies
        uses: actions/cache@v2
        with:
          path: ~/.gradle/caches
          key: ${{ runner.os }}-gradle-caches-${{ hashFiles('gradle/wrapper/gradle-wrapper.properties') }}
          restore-keys: |
            ${{ runner.os }}-gradle-caches-
      - name: Make Gradlew Executable
        run: cd android && chmod +x ./gradlew

      - name: Generate App APK
        run: |
          cd android && ./gradlew assembleRelease --no-daemon

      ## sign generated apk
      - name: Sign APK
        id: sign_app
        uses: r0adkll/sign-android-release@v1
        with:
          releaseDirectory: android/app/build/outputs/apk/release
          signingKeyBase64: ${{ secrets.ANDROID_SIGNING_KEY }}
          alias: ${{ secrets.ANDROID_ALIAS }}
          keyStorePassword: ${{ secrets.ANDROID_KEY_STORE_PASSWORD }}
          keyPassword: ${{ secrets.ANDROID_KEY_PASSWORD }}

      ## Distribute app to Firebase App Distribution for testing / use google play internal track if you have a google play account
      - name: upload artifact to Firebase App Distribution
        uses: wzieba/Firebase-Distribution-Github-Action@v1
        with:
          appId: ${{secrets.ANDROID_FIREBASE_APP_ID}}
          token: ${{secrets.ANDROID_FIREBASE_TOKEN}}
          groups: testers
          file: ${{steps.sign_app.outputs.signedReleaseFile}}
As you can see, the workflow contains three main attributes.
name: the name of the workflowon: when we can run the workflow, in our case, whenever a new release has been published to Github, addingworkflow_dispatchallows the user to trigger the workflow manually from Github UI.jobs: we describe the workflow requirements such as the name and machine used to run the build.
Every job has multiple steps when we can use a Github action from the marketplace or simply run a command.
In the first six steps, we mainly set up dependencies and requirements for our build, such as installing JDK, configuring cache for yarn and Gradle build system, and making the gradlew executable.
Next, we run the build script to generate unsigned APK using the gradlew command already tested locally.
✔️ Singing Configuration
We will use r0adkll/sign-android-release@v1; this action will help us sign the android APK using our private signing keys as we already generated in the first step.
Here are the environment variables we need to provide as Github secrets:
ANDROID_SIGNING_KEY: The base64 encoded signing key used to sign your app
You can prepare your key by running this command on *nix systems.
openssl base64 < my-upload-key.keystore | tr -d '\n' | tee my-upload-key.keystore.base64.txt
Then copy the contents of the .txt file to your ANDROID_SIGNING_KEY GH secret.
ANDROID_ALIAS: The alias of your signing keyANDROID_KEY_STORE_PASSWORD: The password to your signing KeystoreANDROID_KEY_PASSWORD: The private key password for your signing Keystore
To add new GH secrets, open your Github project home page > Project Setting > Secrets > Actions > new repository secret
✔️ Firebase App distribution
To distribute the app to our internal team and testers, we will use Firebase App distribution, A free-to-use tool backed by Google that helps you distribute your apps to testers.
To use Firebase App distribution, first.
- Go to https://console.firebase.google.com/ , press + button to create a new firebase app
- Enter your project name and continue
- Disable google analytics for this project and continue
- When your project is ready, click continue
- On your app home page, click the android icon to add a new android app.
- Add your android package name and App nickname, click register app > next > next> register app
- Go to project setting ⚙️ (In the top of the side menu, near to Project overview 😀), scroll to
your Appssection you will find your app ID(x:xxxxx) - Go to
Release & Monitor>App Distribution> Accept Terms of services and clickGet Started. - Go to
Testers & Groupsand add a new group calledtesters. - Go to
Invite links, clickNew link, select thetestergroup, and thencreate link. then a new public link will be generated to add more testers
To upload the APK to the Firebase distribution app, we will use wzieba/Firebase-Distribution-Github-Action@v1 and provide the following GH secrets:
-
ANDROID_FIREBASE_APP_ID: App id: can be found on the General Settings page. -
ANDROID_FIREBASE_TOKEN: Upload token - see Firebase CLI Reference (tldr; runfirebase login:cicommand to get your token).
✔️ Distribute To Google play
We are mainly going to use the same approach to release the app to Google Play, but we will use the .aab bundle instead of APK.
The last three steps should look like the following:
# Building and signing App
- name: Build Android App Bundle
  run: |
    cd android && ./gradlew bundleRelease --no-daemon

- name: Sign App Bundle
  id: sign_app
  uses: r0adkll/sign-android-release@v1
  with:
    releaseDirectory: android/app/build/outputs/apk/release
    signingKeyBase64: ${{ secrets.ANDROID_SIGNING_KEY }}
    alias: ${{ secrets.ANDROID_ALIAS }}
    keyStorePassword: ${{ secrets.ANDROID_KEY_STORE_PASSWORD }}
    keyPassword: ${{ secrets.ANDROID_KEY_PASSWORD }}

## Distribute  App to google play alpha track
- name: Upload App to Google Play
  uses: r0adkll/upload-google-play@v1
  with:
    serviceAccountJsonPlainText: ${{ secrets.ANDROID_SERVICE_ACCOUNT_JSON_TEXT }}
    packageName: com.test.test
    releaseFiles: android/app/build/outputs/bundle/release/*.aab
    track: alpha
    status: completed
    inAppUpdatePriority: 2
To upload your .aab to Google Play, you need to generate A new service account.
⚠️ Make sure to delete signing the release aab with debug credentials in
android/app/build.gradle
⚠️ Only Owners can generate service account JSON files
Here is a complete guide on how to generate an Android service account 👉 Generate Service account JSON file
Then you can JSON file content to Github secrets under ANDROID_SERVICE_ACCOUNT_JSON_TEXT name.
The best way is to create two separate workflows, one for firebase testers and one for Google Play.
IOS Workflow
The first step is to generate bundle Id, certification, and Provisioning Profile for distribution and install them on your mac. check IOS code singing guide
✔️ Configure IOS project on xcode
-
Open your project on xcode by double click on
ios/XXXX.xcworkspace(⚠️ not.xcodeprojfile) -
Select project target >
Singing & Capabilities>Release -
Uncheck
Automatically manage singing -
In
Provisioning Profile, import the profile you already downloaded. -
If the certificate associated with the profile is already installed on your device you should see it in
Signing Certificatealso, you should see the team name appear automatically
if you still see missed certificate error even though you are sure you already installed it on your device, close Xcode and reopen it again 😎
✔️ Build and upload the first version to TestFlight using xcode
Same as we did for Android, and to make sure everything works as expected, I recommend building and uploading the first release using Xcode.
- At the top of Xcode, you need to set your simulator to Any iOS device.
- In the top menu, click on
Archiveunder Product. - After the archive is completed, the organizer window will popup, and you'll be able to Distribute your App.
✔️ Create a new github workflow ios_build.yml and add the following content
name: IOS Production Build

on:
  workflow_dispatch:
  release:
    types: [published] # only run the workflow when a new release has been published

jobs:
  ios-build:
    name: IOS Production Build
    runs-on: macOS-latest
    defaults:
      run:
        working-directory: ios

    steps:
      - name: Check out Git repository
        uses: actions/checkout@v2

      - name: Get yarn cache directory path
        id: yarn-cache-dir-path
        run: echo "::set-output name=dir::$(yarn cache dir)"

      - name: Restore node_modules from cache
        uses: actions/cache@v2
        id: yarn-cache
        with:
          path: ${{ steps.yarn-cache-dir-path.outputs.dir }}
          key: ${{ runner.os }}-yarn-${{ hashFiles('**/yarn.lock') }}
          restore-keys: |
            ${{ runner.os }}-yarn-

      - name: Install dependencies
        run: yarn install --frozen-lockfile --network-timeout 300000

      - name: Setup Ruby (bundle)
        uses: ruby/setup-ruby@v1
        with:
          ruby-version: 2.6
          bundler-cache: true

      - name: Restore Pods cache
        uses: actions/cache@v2
        with:
          path: |
            ios/Pods
            ~/Library/Caches/CocoaPods
            ~/.cocoapods
          key: ${{ runner.os }}-pods-${{ hashFiles('ios/Podfile.lock') }}
          restore-keys: |
            ${{ runner.os }}-pods-

      - name: Install Pods
        run: cd ios && pod install --repo-update && cd ..

      - name: Build IOS App
        uses: yukiarrr/ios-build-[email protected]
        with:
          project-path: ios/MyApp.xcodeproj
          p12-base64: ${{ secrets.IOS_P12_BASE64 }}
          mobileprovision-base64: ${{ secrets.IOS_MOBILE_PROVISION_BASE64 }}
          code-signing-identity: 'iPhone Distribution'
          team-id: ${{ secrets.IOS_TEAM_ID }}
          certificate-password: ${{ secrets.IOS_CERTIFICATE_PASSWORD }}
          workspace-path: ios/MyApp.xcworkspace
          scheme: MyApp

      - name: 'Upload app to TestFlight'
        uses: apple-actions/upload-testflight-build@v1
        with:
          app-path: 'output.ipa'
          issuer-id: ${{ secrets.APPSTORE_ISSUER_ID }}
          api-key-id: ${{ secrets.APPSTORE_API_KEY_ID }}
          api-private-key: ${{ secrets.APPSTORE_API_PRIVATE_KEY }}
As we may notice, we are using the same approach to install dependencies and configure the cache for Yarn, Pods, and Ruby in the first steps.
To build the app, we use yukiarrr/[email protected] to export the IPA to upload it to TestFlight.
The build action will need the following variables to be added as Github Secrets:
IOS_MOBILE_PROVISION_BASE64: Base64 encoded Provisioning profile file.
Download it from your Apple developer portal and use the following script to generate base64 encoded format.
openssl base64 < MY_Profile.mobileprovision | tr -d '\n' | tee my-profile.base64.txt
IOS_P12_BASE64: Base64 encoded.p12file (key + cert)
After installing the certificate on your Mac, Open Keychain Access App, select "My Certificates" on the top, and locate the certificate you've downloaded.
Expand the certificate to see the corresponding private key. Then select the certificate and private key, then right-click for the context menu on the items and choose "Export 2 items…".
Pick a location on disk to save the file as a .p12 and choose a strong password for the file(IOS_CERTIFICATE_PASSWORD)
Generate a base64 for the .p12 file using
openssl base64 < cert.p12 | tr -d '\n' | tee cert.base64.txt
-
IOS_TEAM_ID: your apple team id https://developer.apple.com/account/#!/membership/ -
IOS_CERTIFICATE_PASSWORD: Password used to generate p2 certificate.
Our last step is to upload generated ipa to TestFlight using upload-testflight-build:
-
APPSTORE_ISSUER_ID: Go to Users and Access > API Keys, the issuer id is something like598542-36fe-1a63-e073-0824d0166672a -
APPSTORE_API_KEY_ID: The Key ID for AppStore Connect API. -
APPSTORE_API_PRIVATE_KEY: The PKCS8 format Private Key for AppStore Connect API. The content of the fileAuthKey_xxxxxx.p8generated
If you are interested to setup GitHub workflows with multiple app variants, please let me know in the comments section 👇
Bonus
What if i told you that you could start your next project with All those workflows already ready for you, Well, you can use Obytes react native template based on our Mobile tribe best practices and come with the following features :
- ✅ Last React Native version
- 🎉 Type checking TypeScript
- 💅 Minimal UI kit using @shopify/restyle with theming
- 🤖 Auto generate App Icon using react-native-make and Splash screen using react-native-bootsplash
- 🦊 Husky for Git Hooks
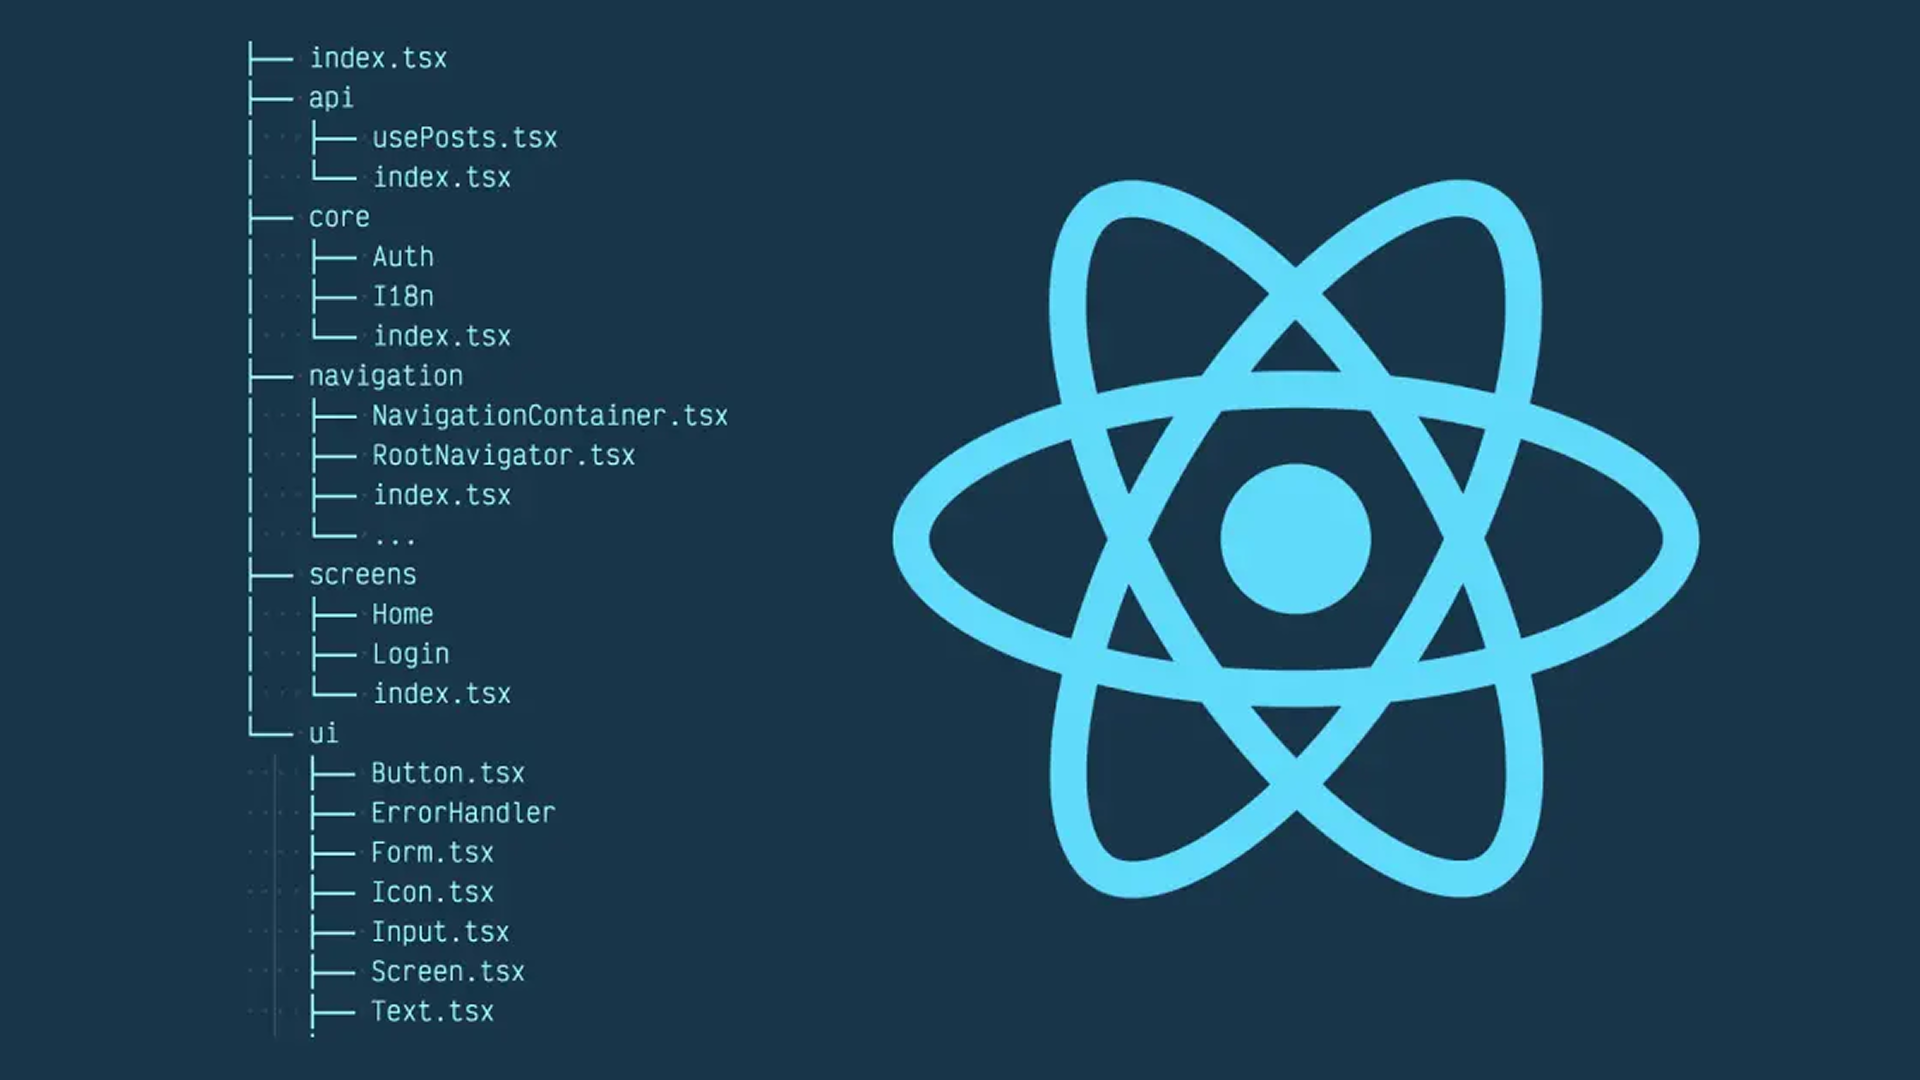
- 💡 Clean project structure with Absolute Imports
- 🚫 Lint-staged for running linters on Git staged files
- 🗂 VSCode recommended extensions configuration
- ☂️ React Navigation pre-installed with examples
- 💫 Auth flow with zustand and react-native-mmkv as a storage to save sensitive data.
- 🛠 A simple workflow to build, release and distribute your application using Github action
- 🔥 React Query & axios to fetch Data
- 🧵 A good approach with example to handle forms based on react-hook-form and yup for validation
- ⚙️ Handel environment variables with react-native-env
- 🎯 Localization
And you can use it as a template for react-native cli.
npx react-native init MyApp --template https://github.com/obytes/react-native-template-obytes
Make sure to give it a try and help us improve the template.
I hope you found that interesting, informative, and entertaining. I would be more than happy to hear your remarks and thoughts about this solution in The comments.
If you think other people should read this post. Tweet,share and Follow me on Twitter for the next articles.