


One of the most challenging things in react-native is choosing the right navigation, and that’s because Facebook use a native navigation system (a native app that has some RN views). So this will lead us to the two most popular navigation solutions react-native-navigation by Wix and react-navigation by Airbnb. and of course, as mentioned in the title we’ll be using react-native-navigation. To see the difference between the two solutions check out Choose the right native navigation library.
First, what is navigation ?
Before we start let’s first talk about navigation and the problem we are trying to solve. Basically navigation it’s a crucial part of the app, It’s responsible for handling the interactions that allow users to move across, into, out from different content areas within your app.
Why react-native-navigation(RNN)?
As mentioned in the react-native docs, RNN provides native navigation in both Android and IOS.That’s exactly what we are looking for after all; the navigation should feel familiar to our user’s. Also the word native means that the library will be more efficient and have smooth transitions between screens 😃.
After that being, said let’s create an application, integrate RNN and play with the basics of the RNN (stack, setRoot, push, pop, modal, etc...)
Getting started.
1- Go to the command line and start a new react native project using react-native CLI. The reason we used react-native init and not expo init is that we’ll need to add some native code to our app.
react-native init RNNIntro
Next, we’ll install react-native-navigation package using npm or yarn.
yarn add react-native-navigation
or
npm install --save react-native-navigation
Then we’ll need to link the native dependencies and add some native code into our project.
For IOS follow these instructions.
For Android follow these instructions.
The Basics
After successfully adding the react-native-navigation now let’s see how to implement the navigation.
First, let’s add the files and folders:
> cd RNNIntro && mkdir src
> cd src && mkdir Navigation screens
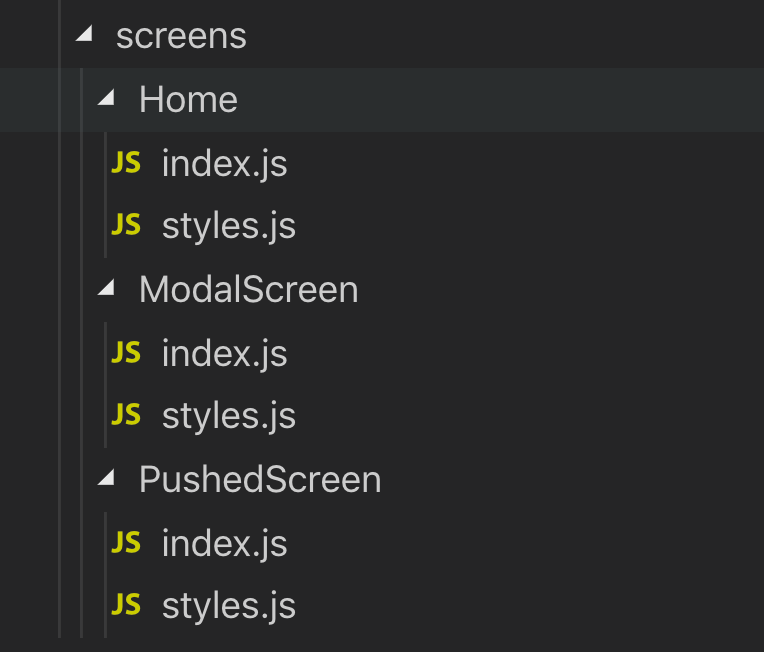
Here 👆we added the src folder that will contain Navigation and screens folders
> cd Navigation && touch index.js screens.js
> cd ./screens && mkdir Home && cd Home && touch index.js styles.js
> cd .. && mkdir PushedScreen && cd PushedScreen && touch index.js styles.js
> cd .. && mkdir ModalScreen && cd ModalScreen && touch index.js styles.js
☝️ here we added index.js and screens.js to the Navigation folder and added the Home folder which contains index.js and styles.js files.
For now, the folder structure should look like this
In the Navigation/screens.js we will register all our screens, after all, every screens component must be registered with a unique name
2. Registering the screens
// screens.js
import { Navigation } from 'react-native-navigation';
import Home from '../screens/Home';
import PushedScreen from '../screens/PushedScreen';
import ModalScreen from '../screens/ModalScreen';

export function registerScreens() {
  Navigation.registerComponent('HomeScreen', () => Home);
  Navigation.registerComponent('PushedScreen', () => PushedScreen);
  Navigation.registerComponent('ModalScreen', () => ModalScreen);
}
Here 👆 we registered the Home, pushedScreen and the ModalScreen components and we gave each one of them a unique name.
// Navigation/index.js
import { Navigation } from 'react-native-navigation';
import { registerScreens } from './screens';

registerScreens();
export const start = () => {
  Navigation.events().registerAppLaunchedListener(() => {
    Navigation.setRoot({
      root: {
        component: {
          name: 'HomeScreen',
        },
      },
    });
  });
};
Then in the Navigation/index.js we call the registerScreens function and initialize the screens (it should be called before creating the root of our navigation). then we also initiated the app via setRoot command.
3. Initialize the app
// index.js
import { start } from './src/Navigation';

start();
Now let’s update index.js and call the start function to initialize the application.
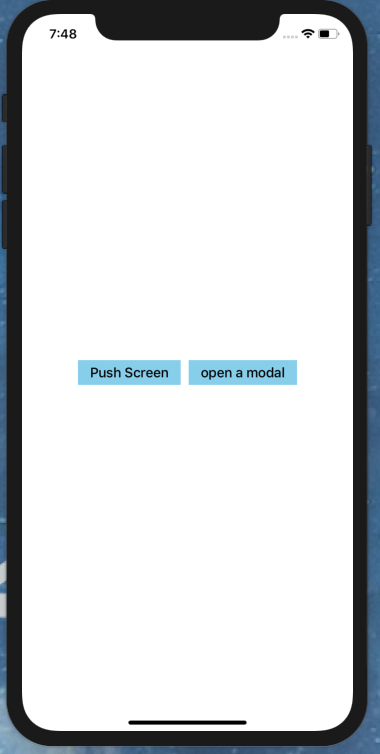
Adding Home screen
Now let’s add some basic styles to our Home screen
// Home/index.js
import React from 'react';
import { View, Text, TouchableOpacity } from 'react-native';
import styles from './styles';

const Home = () => {
  return (
    <View style={styles.container}>
      <View style={styles.buttonsSection}>
        <TouchableOpacity style={styles.buttonWrapper}>
          <Text style={styles.buttonText}>Push Screen</Text>
        </TouchableOpacity>
        <TouchableOpacity style={styles.buttonWrapper}>
          <Text style={styles.buttonText}>open a modal</Text>
        </TouchableOpacity>
      </View>
    </View>
  );
};

export default Home;
// Home/styles.js
import { StyleSheet } from 'react-native';

const styles = StyleSheet.create({
  container: {
    flex: 1,
    alignItems: 'center',
    justifyContent: 'center',
  },
  buttonsSection: {
    flexDirection: 'row',
    justifyContent: 'space-between',
  },
  buttonWrapper: {
    paddingHorizontal: 15,
    paddingVertical: 5,
    backgroundColor: 'skyblue',
    marginHorizontal: 5,
  },
  buttonText: {
    fontSize: 17,
    fontWeight: '500',
  },
});

export default styles;
Now the app should look like this
Pushing your first Screen
In order to push a screen, we need to use Navigation.push this method expects to receive the currently presented component id from screen props.componentId.
Now let’s use the push screen button to navigate us to the next screen.
Here is how the Home/index.js will look like
import React from 'react';
import { View, Text, TouchableOpacity } from 'react-native';
import { Navigation } from 'react-native-navigation';
import styles from './styles';

const pushScreen = (props) => {
  const { componentId } = props;
  Navigation.push(componentId, {
    component: {
      name: 'PushedScreen',
    },
  });
};
const Home = (props) => {
  return (
    <View style={styles.container}>
      <View style={styles.buttonsSection}>
        <TouchableOpacity
          onPress={() => pushScreen(props)}
          style={styles.buttonWrapper}
        >
          <Text style={styles.buttonText}>Push Screen</Text>
        </TouchableOpacity>
        <TouchableOpacity style={styles.buttonWrapper}>
          <Text style={styles.buttonText}>open a modal</Text>
        </TouchableOpacity>
      </View>
    </View>
  );
};

export default Home;
Let’s add some basic styles to the pushScreen component
// PushedScreen/index.js
import React from 'react';
import { View, Text, TouchableOpacity } from 'react-native';
import styles from './styles';

const PushedScreen = (props) => {
  return (
    <View style={styles.container}>
      <Text style={styles.headerText}>Pushed Screen</Text>
      <TouchableOpacity style={styles.backButton}>
        <Text style={styles.backButtonText}>Go Back</Text>
      </TouchableOpacity>
    </View>
  );
};

export default PushedScreen;
// PushedScreen/styles.js
import { StyleSheet } from 'react-native';

const styles = StyleSheet.create({
  container: {
    flex: 1,
    alignItems: 'center',
    justifyContent: 'center',
    backgroundColor: 'skyblue',
  },
  headerText: {
    fontSize: 25,
    color: '#222222',
    marginBottom: 15,
  },
  backButton: {
    backgroundColor: '#FFFFFF',
    paddingHorizontal: 10,
    paddingVertical: 10,
  },
  backButtonText: {
    fontSize: 20,
    color: '#222222',
  },
});

export default styles;
Please go and test the above code first before you continue reading
Welcome back 😜. As expected nothing happened after clicking the push screen button and the reason for that is because we should use the stack layout type in order to navigate.
Update the Navigation/index.js setRoot command
Navigation.setRoot({
  root: {
    stack: {
      children: [
        {
          component: {
            name: 'HomeScreen',
          },
        },
      ],
    },
  },
});
Now try again and voila you pushed your first screen.
I know I know. it looks bad but let’s keep it that way for the sake of simplicity 😛
Keep in your mind that when navigating, we can pass props to the screen that we are pushing and also we can use options to style the navigator appearance. We will explore them while opening a modal
Pop the screen
After pushing the current screen the user should be able to go back to the previous one, this can be done by taping the top bar's back arrow button which is provided by default (we can always hide the top bar using options if we want) or by swiping your finger from left to right if your in IOS. Or using the Navigation.pop method
Now let’s go and attach the navigation.pop with the goBack button
// PushedScreen/index.js
import React from 'react';
import { View, Text, TouchableOpacity } from 'react-native';
import { Navigation } from 'react-native-navigation';
import styles from './styles';

const goBack = ({ componentId }) => Navigation.pop(componentId);
const PushedScreen = (props) => {
  return (
    <View style={styles.container}>
      <Text style={styles.headerText}>Pushed Screen</Text>
      <TouchableOpacity onPress={() => goBack(props)} style={styles.backButton}>
        <Text style={styles.backButtonText}>Go Back</Text>
      </TouchableOpacity>
    </View>
  );
};
export default PushedScreen;
Opening Your first Modal.
Before we open the modal let’s talk first about the differences between the openModal and pushScreen in RNN and when to use a modal
Basically, a modal is just an alternative way to push a screen but it has some functionality and behaviors that make it unique for example:
- Modal has a sliding up animation by default (Android)
- Modal has no default back button.
When to use a modal?
Modals are used when the user’s immediate attention is required as it prevents them from interacting with views beneath it. Typical use cases for modals are alerts, action sheets, and short tasks and flows.
Now let’s create open the modal.
First, let’s attach the navigation openModal method to our button in the home screen.
import React from 'react';
import { View, Text, TouchableOpacity } from 'react-native';
import { Navigation } from 'react-native-navigation';
import styles from './styles';

const pushScreen = (props) => {
  const { componentId } = props;
  Navigation.push(componentId, {
    component: {
      name: 'PushedScreen',
    },
  });
};

const openModal = () => {
  Navigation.showModal({
    stack: {
      children: [
        {
          component: {
            name: 'ModalScreen',
            passProps: {
              text: 'This is the modal screen',
            },
            options: {
              topBar: {
                title: {
                  text: 'Title text',
                },
                leftButtons: [
                  {
                    color: 'skyblue',
                    text: 'button',
                    id: 'leftButton',
                  },
                ],
              },
            },
          },
        },
      ],
    },
  });
};
const Home = (props) => {
  return (
    <View style={styles.container}>
      <View style={styles.buttonsSection}>
        <TouchableOpacity
          onPress={() => pushScreen(props)}
          style={styles.buttonWrapper}
        >
          <Text style={styles.buttonText}>Push Screen</Text>
        </TouchableOpacity>
        <TouchableOpacity onPress={openModal} style={styles.buttonWrapper}>
          <Text style={styles.buttonText}>open a modal</Text>
        </TouchableOpacity>
      </View>
    </View>
  );
};

export default Home;
Let’s breakdown the openModal method:
- passProps: allow me to pass props to the pushed screen, in this case, the props name is text and its value is this is the modal screen
- options: in the options object we specified the top bar title and added the left button
Now let’s go to ModalScreen and give it some basic styles
// ModalScreen/index.js
import React, { Component } from 'react';
import { View, Text, TouchableOpacity } from 'react-native';
import { Navigation } from 'react-native-navigation';
import styles from './styles';

class ModalScreen extends Component {
  constructor(props) {
    super(props);
    Navigation.events().bindComponent(this);
  }

  navigationButtonPressed({ buttonId }) {
    if (buttonId === 'leftButton') {
      Navigation.dismissModal(this.props.componentId);
    }
  }

  render() {
    const { text } = this.props;
    return (
      <View style={styles.container}>
        <Text style={styles.headerText}>{text}</Text>
      </View>
    );
  }
}

export default ModalScreen;
As you can see here 👆we added the navigationButtonPressed event which will be called whenever a TopBar button is pressed by the user, then we dismiss the modal when the user has clicked on the left button (we gives the button the id of ‘leftButton’). Inside the render function, we retrieved and displayed the text prop.
// ModalScreen/styles.js
import { StyleSheet } from 'react-native';

const styles = StyleSheet.create({
  container: {
    flex: 1,
    alignItems: 'center',
    justifyContent: 'center',
    backgroundColor: 'skyblue',
  },
  headerText: {
    fontSize: 25,
    color: '#222222',
    marginBottom: 15,
  },
});

export default styles;
Bonus
As you are my favorite reader, I want to share with you a better way to structure your navigation. Instead of declaring the navigation function on each component let's declare all of our functions in Navigation/index.js.
1- go and remove openModal and PushScreen functions from Home/index.js.
2- open Navigation/index.js and add the navigation functions
export const pushScreen = (props) => {
  const { componentId } = props;
  Navigation.push(componentId, {
    component: {
      name: 'PushedScreen',
    },
  });
};

export const openModal = () => {
  Navigation.showModal({
    stack: {
      children: [
        {
          component: {
            name: 'ModalScreen',
            passProps: {
              text: 'This is the modal screen',
            },
            options: {
              topBar: {
                title: {
                  text: 'Title text',
                },
                leftButtons: [
                  {
                    color: '#00bfff',
                    text: 'button',
                    id: 'leftButton',
                  },
                ],
              },
            },
          },
        },
      ],
    },
  });
};
3- To easily import this file we'll add package.json file to Navigation folder.
{
	"name": "Navigation"
}
4- Now go to Home/index.js and import the functions and replace
import { Navigation } from 'react-native-navigation';
with
import { pushScreen, openModal } from 'Navigation';
Thanks for reading.
I hope you enjoyed this quick intro to RNN as I did, and good luck with your react-native-navigation journey. Please Check the repo and don’t forget to follow me on Twitter and Github