


What's Wasabi?
Wasabi is a real-time, 100% API driven, A/B Testing platform. The platform offers companies and individuals the opportunity to perform experiments on the web, mobile and desktop for back-end and front-end, products and marketing.
Do you want to know more? Meet Wasabi, an Open Source A/B Testing Platform
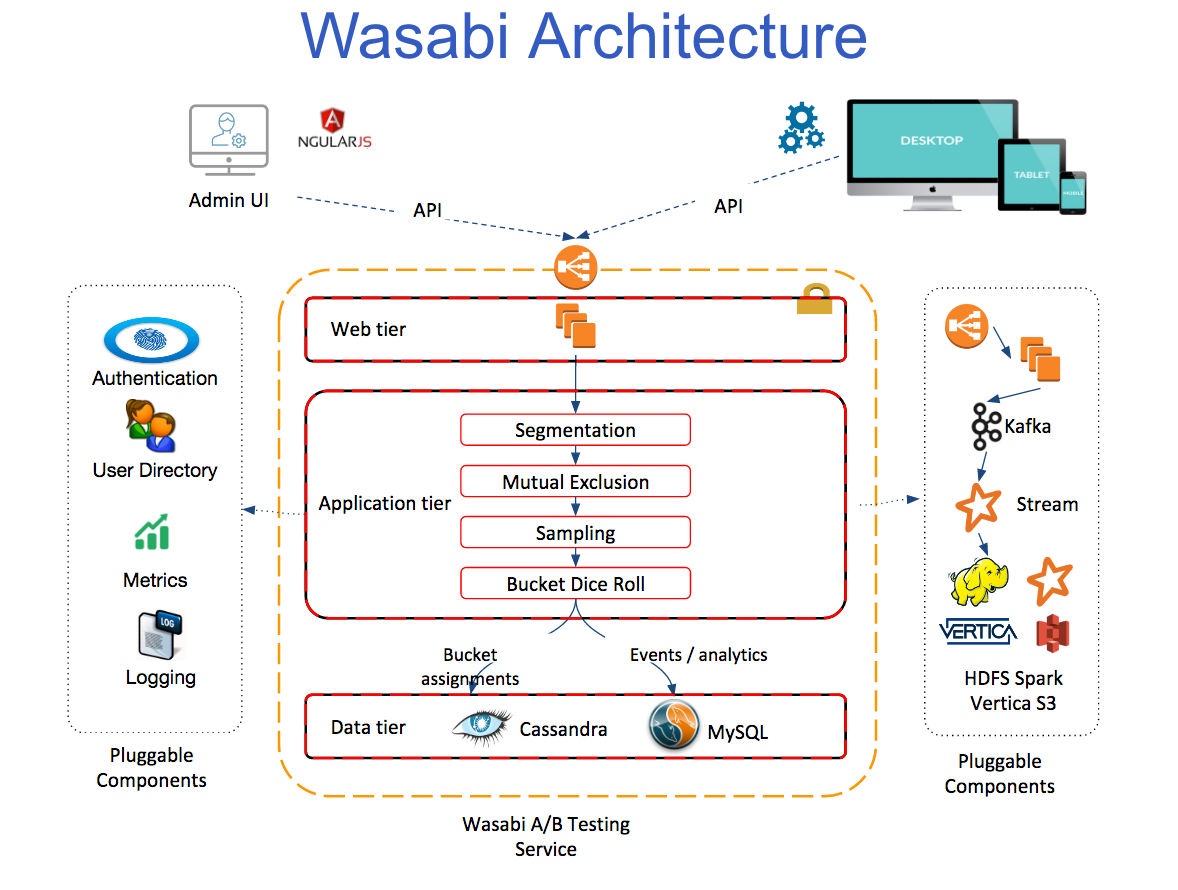
Architecture behind Wasabi
Wasabi is formed by two tiers:
Data tier:
- Cassandra
- MySQL
Web/App tier:
- Wasabi
The Architecture Behind Wasabi, an Open Source A/B Testing Platform
Deploying AWS basic infra
Source code used on this article is available on GitHub. Example variables are provided on terraform.tfvars files for each provider. Modify that variables according to your needs.
S3 bucket for terraform state
First of all, we are going to create an S3 bucket for terraform state files. This will allow us to store terraform state remotely and use terraform remote state data sources.
Network
We need to deploy a VPC, with two private subnets and two public subnets, along with a NAT gateway and Internet Gateway.
- Clone OBytes Wasabi project:
git clone https://github.com/obytes/terraform-wasabi - Go to
terraform_wasabi/providers/aws/network/ terraform init && terraform apply
Deploying Wasabi data tier
Cassandra
Cluster specs
We are going to deploy a Cassandra cluster on AWS, using Terraform. We are going to use this Medium article: First experience deploying Cassandra on AWS as a guide to deploy our Cassandra cluster, and reuse most of the code. Many thanks to Bohdan Kalytka for publishing it along with source code used!
Our Cassandra cluster will be formed of 6 instances, of type m4.large, with EBS volumes (SSD type GP2) of 200GB each. Resources assignment for Cassandra clusters is a fuzzy topic. Nonetheless, most of the checked sources agreed on SSD volumes should be used, and m4.large instance types (2 vCPU, 8GB RAM, memory-optimized) are the smallest type suitable for production clusters.
We are going to deploy this cluster on us-east-1 region, in 2 different AZ: us-east-1a and us-east-1c. We will have 2 seed nodes, and 4 non-seed nodes, distributed between both AZ.
Deploying Cassandra
First of all, we need to generate Cassandra custom AMI. We are going to use Packer for this, and Ansible for provisioning the AMI.
- Set environment variables for Terraform and Packer — AWS_ACCESS_KEY_ID, AWS_SECRET_ACCESS_KEY and AWS_DEFAULT_REGION.
- Edit
terraform_wasabi/modules/aws/cassandra/packer/cassandra_aws_ami.jsonand add your publicvpc_idandsubnet_id(public subnet). - Then run
packer build cassandra_aws_ami.jsonto generate your custom AMI with Cassandra installed. - Copy AMI code generated and change the value of
cassandra_amionterraform_wasabi/providers/aws/cassandra/terraform.tfvars. - Go to
terraform_wasabi/providers/aws/cassandra/ terraform init && terraform apply
Now, you should be able to connect to your Cassandra cluster using cqlsh:
cqlsh <load_balancer_DNS/> -u cassandra -p cassandra
You can change the password using this command: ALTER USER cassandra WITH PASSWORD 'new_password';
Note: If the load balancer show some Cassandra instances out of service, SSH into the instance and restart Cassandra service: sudo service cassandra restart
MySQL
- Go to
terraform_wasabi/providers/aws/mysql/ terraform init && terraform apply
Deploying Wasabi app
Generating a custom AMI
For Wasabi, we have to generate an AMI with custom configuration. We will use Wasabi version 1.0.20180226051442, since there's a bug after this version still unresolved: https://github.com/intuit/wasabi/issues/265.
We will create a t2.medium instance via AWS console, based on Ubuntu 16.04 AMI (ami-759bc50a). We create it on the VPC we previously created using terraform and on a public subnet. We will attach an EBS volume to this instance.
Creating SG and role for the instance
We are going to use terraform to create a SG and role/policy/profile for our instance. We are going to target the creation of these resources.
- Go to
terraform_wasabi/providers/aws/wasabi/ terraform initterraform apply -target aws_security_group.wasabi_sg && terraform apply -target module.prod_wasabi_policy && terraform apply -target module.prod_wasabi_role && terraform apply -target module.prod_wasabi_profile
Bootstrapping Wasabi
SSH to the instance we have just created, clone Wasabi repository and checkout version 1.0.20180226051442.
git clone https://github.com/intuit/wasabi && cd wasabi && git checkout 1.0.20180226051442
Then, bootstrap Wasabi: ./bin/wasabi.sh bootstrap
And reboot the instance: sudo reboot
Configure pom.xml
Now, let's edit pom.xml file and add remote URL for Cassandra/MySQL and config them.
cd wasabi && vi pom.xml
Change the following lines.
<mysql.host>'rds_endpoint'</mysql.host>
<mysql.port>3306</mysql.port>
<mysql.dbName>wasabi</mysql.dbName>
<mysql.username>wasabi</mysql.username>
<mysql.password>'password'</mysql.password>
<mysql.numPartitions>1</mysql.numPartitions>
<mysql.minConnections>10</mysql.minConnections>
<mysql.maxConnections>30</mysql.maxConnections>
<mysql.Args>verifyServerCertificate=false&useSSL=false&requireSSL=false&autoReconnect=true&autoReconnectForPools=true</mysql.Args>
<cassandra.username>cassandra</cassandra.username>
<cassandra.password>'password'</cassandra.password>
<cassandra.experiments.keyspaceName>wasabi_experiments</cassandra.experiments.keyspaceName>
<cassandra.experiments.nodeHosts>'cassandra_elb_endpoint'</cassandra.experiments.nodeHosts>
<cassandra.experiments.port>9042</cassandra.experiments.port>
<cassandra.experiments.useSSL>false</cassandra.experiments.useSSL>
<cassandra.local.dc>us-east</cassandra.local.dc>
<cassandra.experiments.defaultReadConsistency>QUORUM</cassandra.experiments.defaultReadConsistency>
<cassandra.experiments.defaultWriteConsistency>QUORUM</cassandra.experiments.defaultWriteConsistency>
<cassandra.experiments.replicationFactor>3</cassandra.experiments.replicationFactor>
<cassandra.events.nodeHosts>'cassandra_elb_endpoint'</cassandra.events.nodeHosts>
<cassandra.events.port>9042</cassandra.events.port>
We set up defaultReadConsistency and defaultWriteConsistency to QUORUM and replicationFactor to 3. Explaining these values go beyond the scope of this article.
Apply Cassandra migrations
Now, we need to apply migrations to Cassandra DB. For this, we need to follow these steps.
 # Download Cassandra migration tool
  wget https://oss.sonatype.org/content/repositories/public/com/builtamont/cassandra-migration/0.9/cassandra-migration-0.9-jar-with-dependencies.jar
  export CASSANDRA_MIGRATION=/home/ubuntu/wasabi/cassandra-migration-0.9-jar-with-dependencies.jar
  export MIGRATION_SCRIPT=/home/ubuntu/wasabi/modules/repository-datastax/src/main/resources/com/intuit/wasabi/repository/impl/cassandra/migration

  # Install Cassandra 2.1
  echo "deb http://www.apache.org/dist/cassandra/debian 21x main" | sudo tee -a /etc/apt/sources.list.d/cassandra.sources.list
  curl https://www.apache.org/dist/cassandra/KEYS | sudo apt-key add - && sudo apt-key adv --keyserver pool.sks-keyservers.net --recv-key A278B781FE4B2BDA && sudo apt-get update && sudo apt-get install -y cassandra

  # Apply migrations
  CQLSH_USERNAME=cassandra CQLSH_PASSWORD=<password> CQLSH_HOST=<cassandra_elb_endpoint> bin/docker/migration.sh
Apply MySQL migrations
This step shouldn't be necessary, but Wasabi doesn't generate migrations properly when we are using an external MySQL DB. After finishing the installation, it shows this error: https://github.com/intuit/wasabi/issues/348
As a workaround, we installed Wasabi on Docker containers and created a dump of MySQL database. After that, we restored that dump and it worked. You can find the dump on this gist
Install MySQL client: sudo apt-get install mysql-client
Restore the file on your MySQL DB using this command.
mysql -u wasabi -p --host=<mysql_endpoint> < wasabi_mysql_dump.sql
Build and start Wasabi
After all these steps, everything should be OK. So, the only steps left are build Wasabi app and start it! We need to build and run without unit tests, otherwise, the build fails.
MYSQL_HOST=<mysql_endpoint> NODE_HOST=<cassandra_elb_endpoint> ./bin/wasabi.sh -t false build
docker network create wasabi_nw # We need to create docker network prior to start or an error is raised
MYSQL_HOST=<mysql_endpoint> NODE_HOST=<cassandra_elb_endpoint> ./bin/wasabi.sh -t false start:wasabi
docker update --restart always wasabi-main # Configure wasabi container to autostart
Creating an AMI based on this instance
Now, we need to create an AMI based on this instance we've just configured. We can do this via AWS console: https://docs.aws.amazon.com/toolkit-for-visual-studio/latest/user-guide/tkv-create-ami-from-instance.html
Then, we copy the AMI ID and change wasabi_ami on terraform_wasabi/providers/aws/wasabi/terraform.tfvars
Deploying Wasabi app
We will deploy an ALB for Wasabi and 2x instances on 2x different AZ.
- Go to
terraform_wasabi/providers/aws/wasabi/ terraform apply
All set! 🎉 You can reach Wasabi UI on the ELB endpoint and start to use it!