

SVG is a powerful format that allows for the creation and display of graphics on the web. As a developer working with react native and coming from a web background, I have often considered how to take advantage of its capabilities, such as the Path element to build more complex and fancy apps. In this article, we will go throw my journey of learning and building a darwing application that uses react-native-svg library.
Getting started
We can first create a new expo app using the following commands:
npx create-expo-app my-app
yarn add react-native-svg
npx pod-install
Note: Take a look at our Obytes template if you want to start a new react native project
Understanding how SVG path works
In SVG, a path is an element that describes a series of connected lines, curves, and other shapes. The "d" (or "path data") attribute is used to define the shape of the path. It contains a string of commands and coordinates that tell the browser how to draw the path.
The most common commands in path data are:
- M (moveto) - moves the "pen" to a new point without drawing a line
- L (lineto) - draws a line from the current point to a new point
- H (horizontal lineto) - draws a horizontal line from the current point to a new x-coordinate
- V (vertical lineto) - draws a vertical line from the current point to a new y-coordinate
- C (curveto) - draws a cubic Bézier curve from the current point to a new point, with two control points in between
- S (smooth curveto) - draws a smooth cubic Bézier curve from the current point to a new point, with one control point in between
- Q (quadratic Bézier curveto) - draws a quadratic Bézier curve from the current point to a new point, with one control point in between
- T (smooth quadratic Bézier curveto) - draws a smooth quadratic Bézier curve from the current point to a new point
- Z (closepath) - closes the current path by drawing a line from the current point to the initial point.
Building the drawing screen
To detect the user's touches and handle the drawn line, we can use the onTouchMove function and onTouchEnd function in the View component. The onTouchMove function can be used to detect the line as it is being drawn, and the onTouchEnd function can be used to detect if the user has started a new line.
import React from 'react';
import {
  View,
  StyleSheet,
  Dimensions,
  GestureResponderEvent,
} from 'react-native';
import { Svg } from 'react-native-svg';

const { height, width } = Dimensions.get('window');

export default () => {
  const onTouchMove = (event: GestureResponderEvent) => {};
  const onTouchEnd = (event: GestureResponderEvent) => {};

  return (
    <View style={styles.container}>
      <View
        style={styles.svgContainer}
        onTouchMove={onTouchMove}
        onTouchEnd={onTouchEnd}
      >
        <Svg height={height * 0.7} width={width}></Svg>
      </View>
    </View>
  );
};

const styles = StyleSheet.create({
  container: {
    flex: 1,
    justifyContent: 'center',
    alignItems: 'center',
  },
  svgContainer: {
    height: height * 0.7,
    width,
    borderColor: 'black',
    backgroundColor: 'white',
    borderWidth: 1,
  },
});
Then let’s start detecting user's touches and handle them
const [currentPath, setCurrentPath] = useState<string[]>([]);

const onTouchMove = (event: GestureResponderEvent) => {
   const newPath = [...currentPath];

   //get current user touches position
   const locationX = event.nativeEvent.locationX;
   const locationY = event.nativeEvent.locationY;

   // create new point
   const newPoint = `${newPath.length === 0 ? 'M' : ''}${locationX.toFixed(
     0,
   )},${locationY.toFixed(0)} `;

   // add the point to older points
   newPath.push(newPoint);
   setCurrentPath(newPath);
 };
Now we have an array of points the user has touched let's add them to the Path component
<Svg height={height * 0.7} width={width}>
  <Path
    d={currentPath.join('')}
    stroke={'red'}
    fill={'transparent'}
    strokeWidth={2}
    strokeLinejoin={'round'}
    strokeLinecap={'round'}
  />
</Svg>
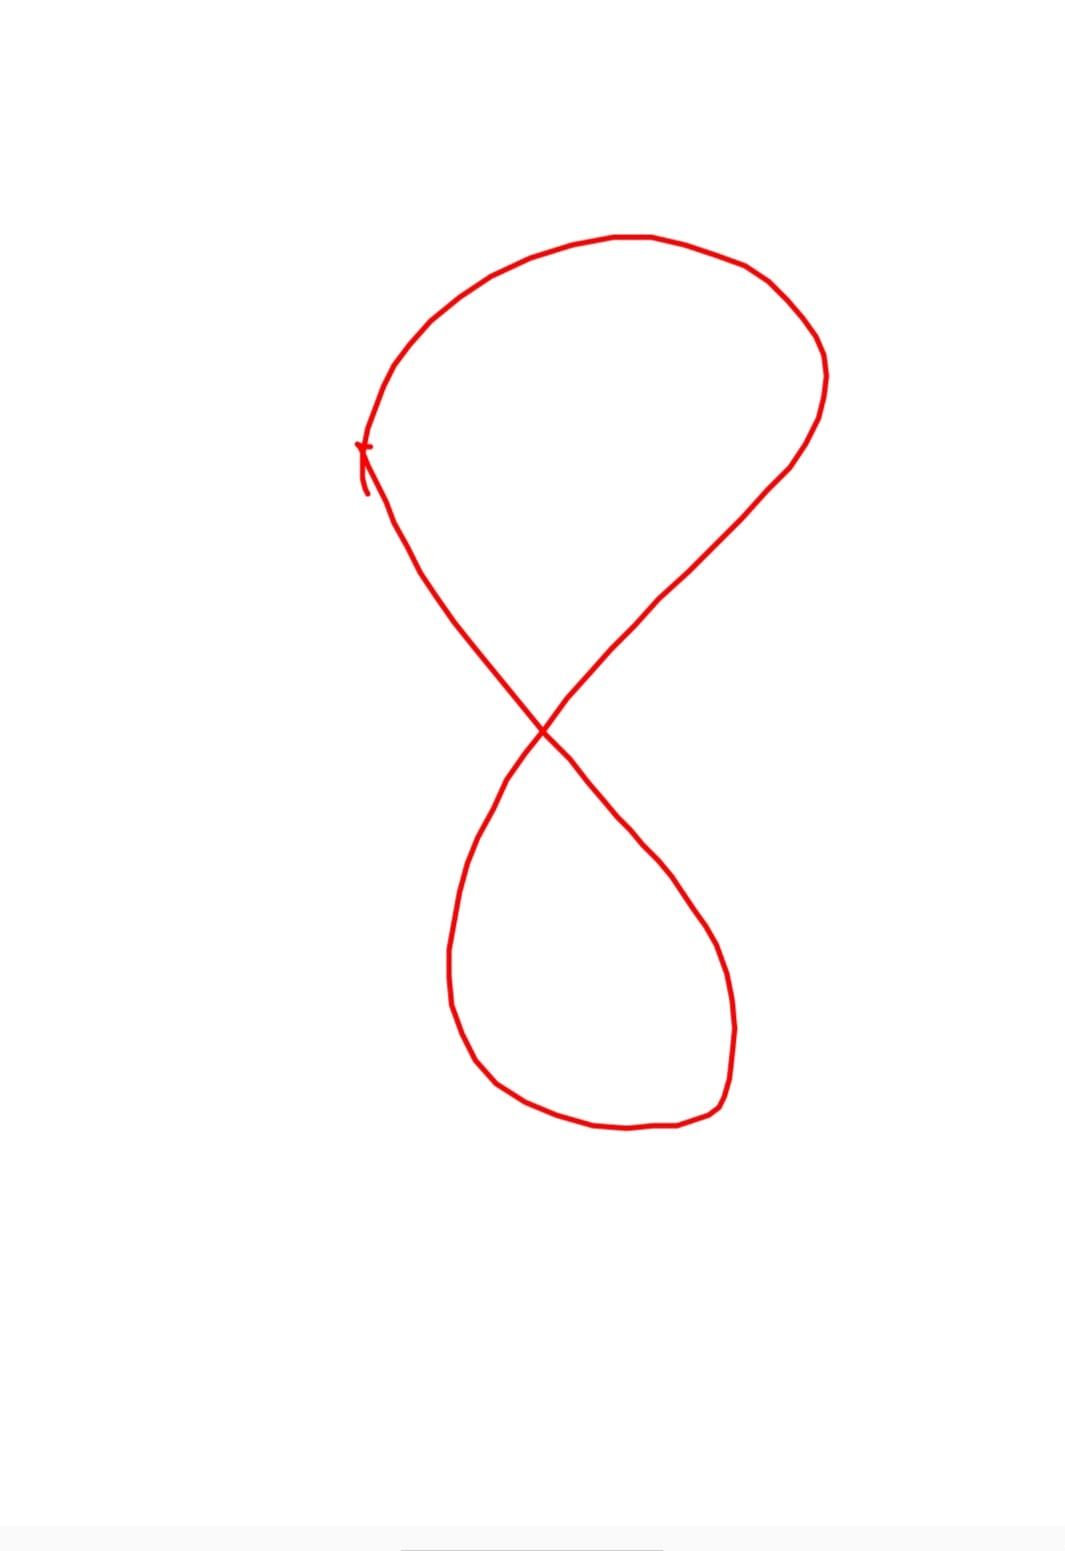
Now this is the result of drawing a number 8 in our screen
Note that various elements, including size, background, and colors, can be customized, but they will not be covered in this blog.
Drawing multiple paths
To handle drawing multiple paths, we can use the onTouchEnd function to detect when the user has finished drawing and is starting a new path. When the user's finger is removed from the screen, we can use this function to create a new path, rather than continuing to draw on the old one. This way, each gesture will be recorded as a separate path.
const onTouchEnd = () => {
   const current paths = [...paths];
   const newPath = [...currentPath];

   //push new path with old path and clean current path state
   currentPaths.push(newPath);
   setPaths(currentPaths);
   setCurrentPath([]);
 };
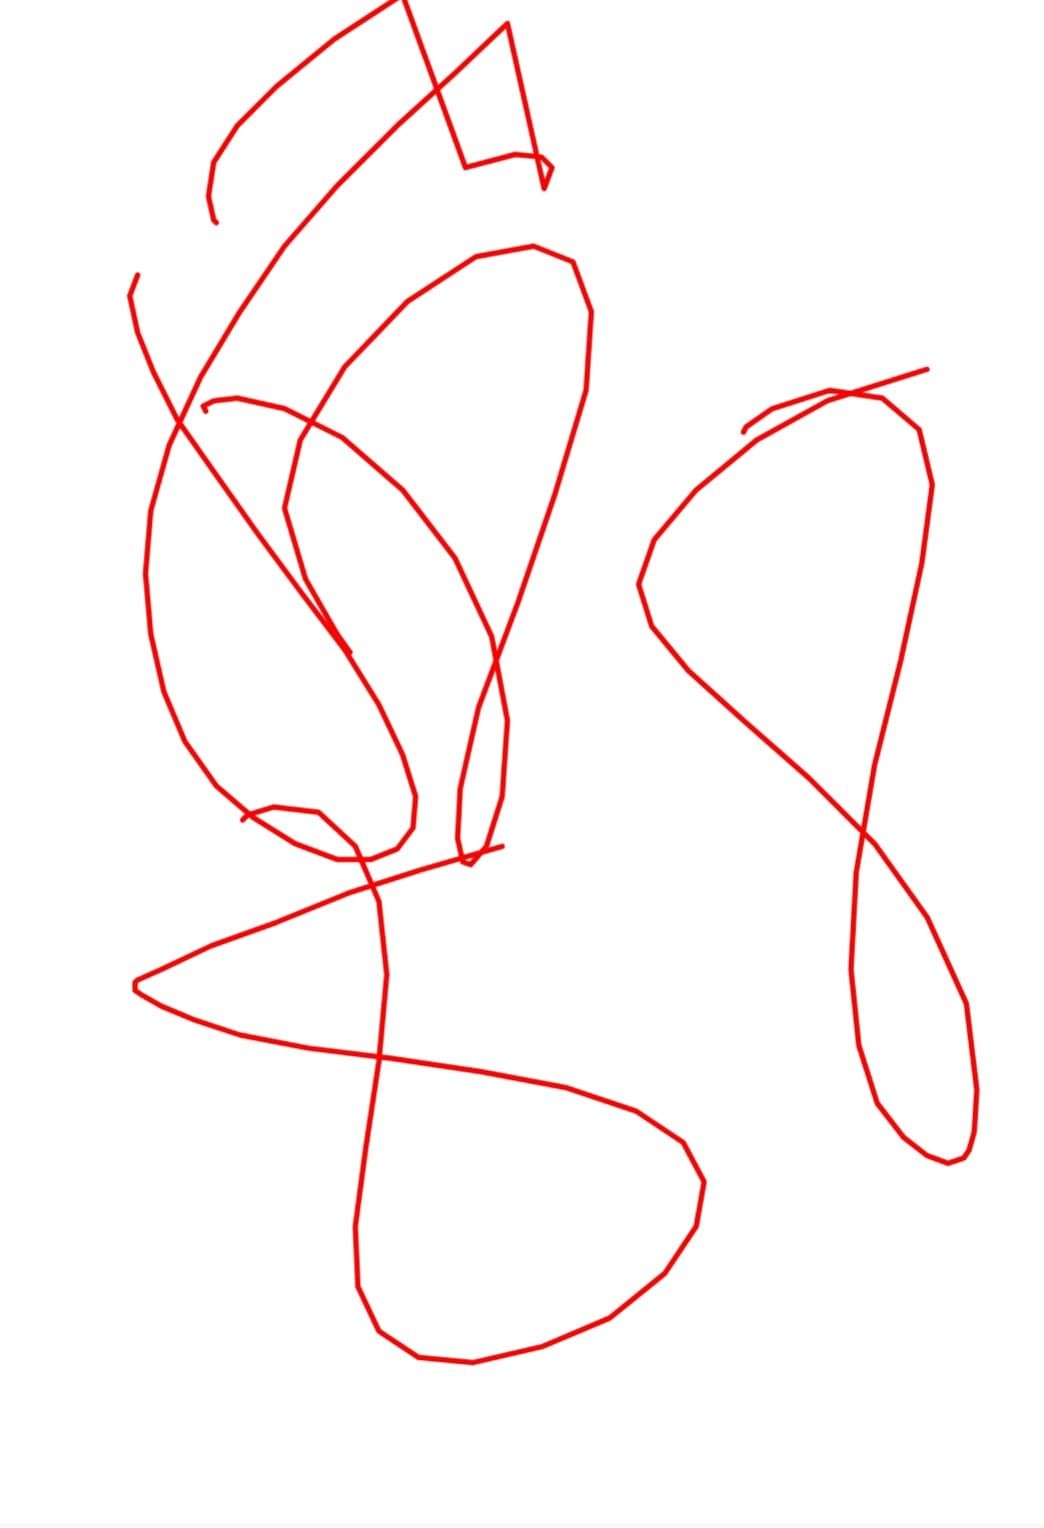
And here we go can draw multiple shapes now
<Svg height={height * 0.7} width={width}>
  <Path
    d={currentPath.join('')}
    stroke={'red'}
    fill={'transparent'}
    strokeWidth={2}
    strokeLinejoin={'round'}
    strokeLinecap={'round'}
  />

  {paths.length > 0 &&
    paths.map((item, index) => (
      <Path
        key={`path-${index}`}
        d={currentPath.join('')}
        stroke={'red'}
        fill={'transparent'}
        strokeWidth={2}
        strokeLinejoin={'round'}
        strokeLinecap={'round'}
      />
    ))}
</Svg>
Saving the drawn shapes
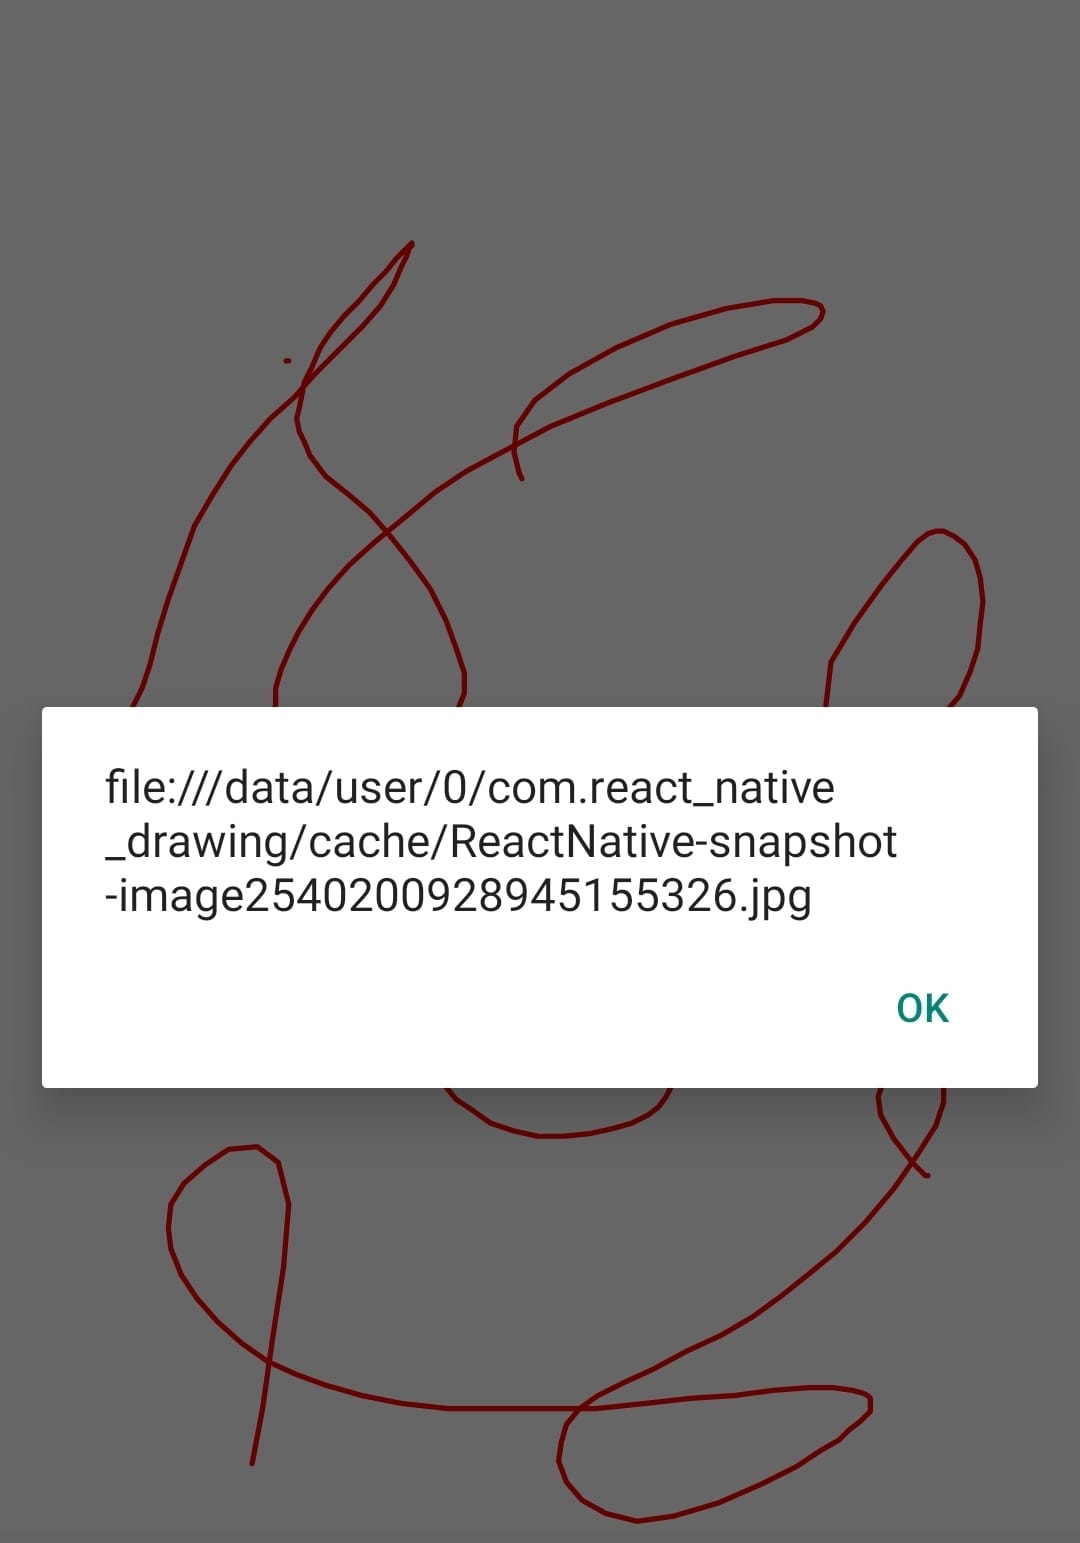
To capture a screenshot of the SVG component, we can use a library such as react-native-view-shot or react-native-canvas to take a screenshot and save it as an image. We need to reference the SVG component by creating a ref, and then passing it to the captureRef function or toDataURL method. Additionally, we can use built-in react-native method takeSnapshotAsync to take a snapshot of the view and save it to the device's camera roll or other location.
<View
  style={styles.svgContainer}
  onTouchMove={onTouchMove}
  onTouchEnd={onTouchEnd}
>
  <ViewShot ref={ref}>
    <Svg height={height * 0.7} width={width}>
      <Path
        d={currentPath.join('')}
        stroke={'red'}
        fill={'transparent'}
        strokeWidth={2}
        strokeLinejoin={'round'}
        strokeLinecap={'round'}
      />

      {paths.length > 0 &&
        paths.map((item, index) => (
          <Path
            key={`path-${index}`}
            d={currentPath.join('')}
            stroke={'red'}
            fill={'transparent'}
            strokeWidth={2}
            strokeLinejoin={'round'}
            strokeLinecap={'round'}
          />
        ))}
    </Svg>
  </ViewShot>
</View>
import ViewShot, { captureRef } from 'react-native-view-shot';

const save = () => {
  captureRef(ref, {
    format: 'jpg',
    quality: 1,
  }).then(
    (uri) => Alert.alert('file saved in', uri),
    (error) => console.error('Oops, snapshot failed', error)
  );
};
In conclusion, SVG is a versatile tool that can be used in various ways to create rich, interactive and dynamic graphics. This blog was an attempt to explore the capabilities of this powerful tool and provide an overview of how it can be used in a real-world scenario. I hope you found the information provided in this blog helpful and it has given you a better understanding of how SVG can be utilized in your projects. Whether you're a developer, designer or a curious learner, SVG is a tool that can be used to create engaging and visually appealing experiences.