

![Math can be fun for frontend developers [Part1].](/_next/image?url=%2Fassets%2Fposts%2F2020-06-03-math-can-be-fun-for-frontend-developers-part1%2Fimages%2Fcat-paws.png&w=3840&q=75)
Intro.
In high school I was not bad at math, rather I was good at it. At that time, I was solving equations, but I had absolutely no idea how it could be applied in the real world. I was relying on memorization and I was given a set of rules with instructions that I need to follow, and that was it. It was satisfying when I got to solve equations, but it felt useless and meaningless, I wondered if I would ever need to use derivatives, vectors and unit circles in the future.
Later I got into a little bit of 2D game design and that was the turning point for me, the light bulb turned on. The connection to math was there and I had to relearn a lot of the concepts I got from school to solve problems like collision detection, simulating velocity and gravity.
This is the first article in a series about math for a front-end developer. Throughout these articles I will introduce a set of math concepts with particle examples, starting with some of the basic concepts and then move to advanced topics. Hopefully by the end of this series, we can develop an intuitive understanding of algebra and basic mathematics. So, let’s jump in!
Before we begin, it's important to note that the examples are made in react but do not worry if you don't know react. The concepts can be applied everywhere.
The progress bar is just an indicator that something is happening, It gives you a visual representation of where you are, how far you’ve come and how close you are to the end. It makes the experience of waiting less boring and frustrating.
HTML5 provides us with a classic nice horizontal progress element. But in this article, we are going to go over how to create our own funny personalized paw steps progress bar which I hope can trick your brain by giving the illusion of the progress bar moving quickly.
First go grab a paw

Let's create a container element where you want to display the progress bar. But while we’re at it let’s also get the responsiveness out of the way. To do this we have to make the container keep its aspect ratio when resized. But what the hell is this aspect ratio and how to create one?
Aspect ratio
As responsive design is becoming more and more essential every day for any digital business, the aspect ratio is now more important to the developer than it has ever been.
Have you ever noticed the black bars displayed in the top and the bottom of your screen. That is an aspect ratio. From a mathematical point of view, the aspect ratio is typically the width of an element in relation to its height. The reason you end up seeing the back bars on your screen is that many films and shows are made in wider ratios than your screen supports. When we say a 16 by 9 ratio (which is commonly written as 16:9) we basically mean the element is 16 units wide and 9 units high. The element will always appear wide no matter how large or small it is. Or rather, a perfect square is denoted by a 1:1 ratio meaning that the width and the height should always stay equal.
The most obvious solution so far for maintaining the aspect ratio of an element in CSS is the padding hack. Specifying the padding a percent, it’s gonna be based on the element’s width. The following means that the height is always going to be 50% of the width.
.wrapper {
  padding-top: 50%;
  width: 100%;
}
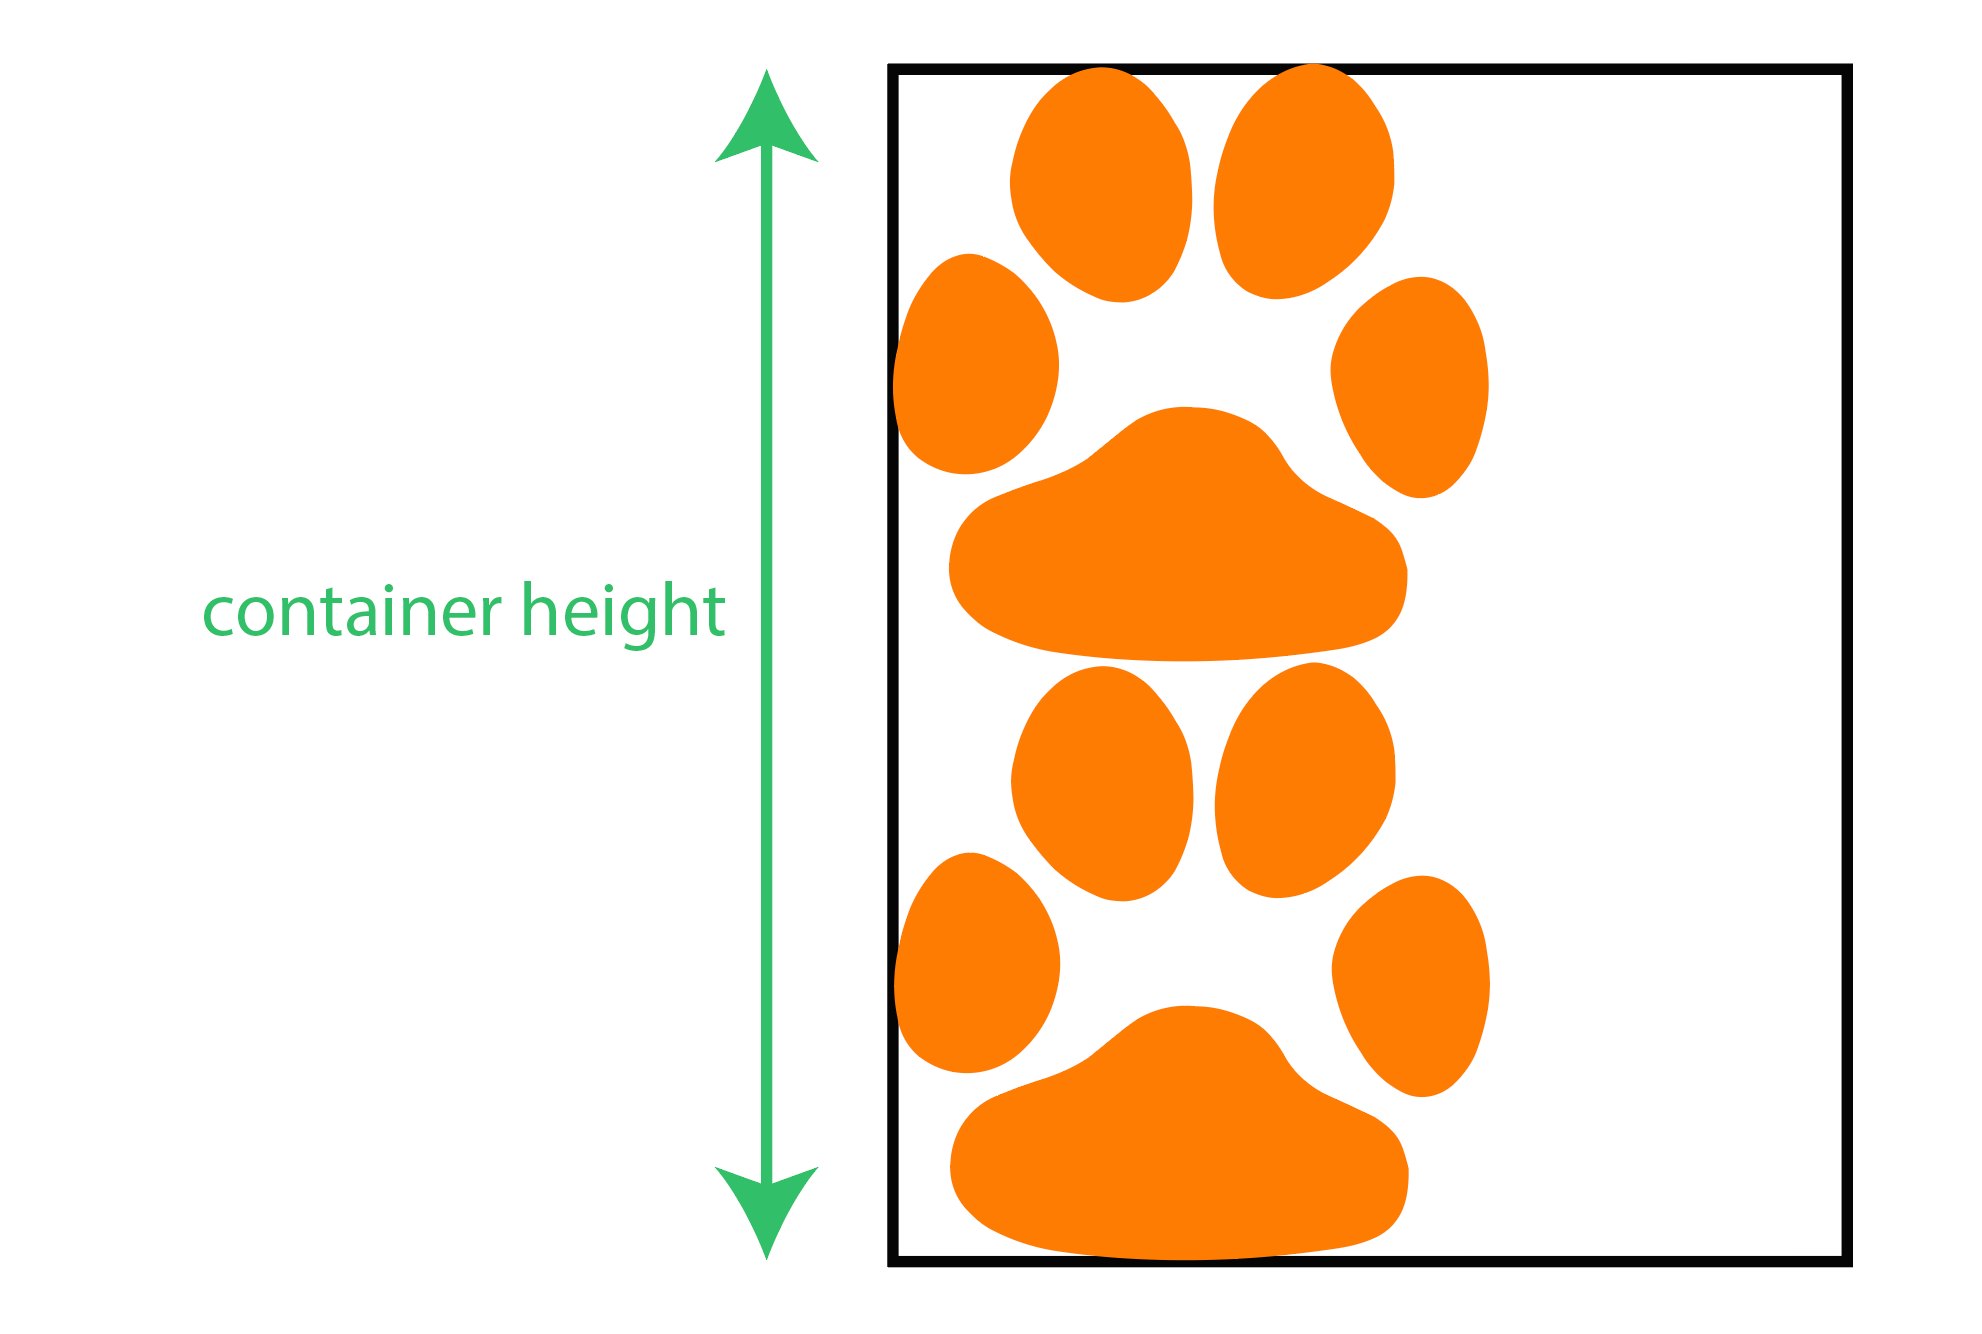
We want the container element to both keep an aspect ratio and to have a height that is as high as the total height of two paws:
I think before we do this though, we have to refresh our minds about percentages:
Percentages
Percentages are one of the common calculations in our everyday life. We think in percentages and we use them a lot. Like how much tax you pay when you buy something, how much something costs when it’s on sale.. And we also use them a lot in our coding. Things like how much available space the modal takes, how much Javascript code is used in this repository and how far we translate the menu when it gets opened.
I am assuming you already have studied fractions and I am sure we all have, because percentages represent a fraction of a 100, meaning that they always have 100 as the denominator. For example
10%
is10
/100
and it literally means how much out of a100
the10
is. A percent is not really a value by itself, it only indicates a value when applied to another value. And since the bottom number of a percent is always a 100 we use this handy little symbol known as the percent sign%
.Originally I have my paws in 60x60, So in order to determine the height of our container element we first need to know how much out of the container width the 60 pixels is. This might bring up the question why the container width? The reason is because we are using the padding hack for the aspect ratio.
Divide 60 by the container width(cw):
60 / cw
And then multiply the result by a 100 to get the percentage:
60 / cw * 100
Now we know what percent of 100 is 60. So the container height going to be:
60 / cw * 100 * 2
Giving that the container’s parent element at a certain screen size is 1350px, the result of the above formula would be exactly 8.88%.
Set the result we got to the CSS padding-top property:
position: relative;
padding-top: 8.88%;
margin-bottom: 2rem;
border: 1px solid;
And now try it out:
Awesome! We ended up with a nice super extra wide element that maintains its aspect ratio when the screen resized.
Typically, calculating the aspect ratio is measured by dividing the width by the height:
width / height
And since the container element's height is 8.88% of the width( w):
w /w * 8.88%
the width (w) cancel out:
w /w * 8.88%
Simplify:
1 / 8.88%
Divide 1 by the fraction form of 8.88%:
1 / (8.88 / 100)
Simplify again:
1 * 100 / 8.88
The result is:
11.26
And remember that aspect ratios are written as a formula of width to height (width:height), So the following is our aspect ratio for the container element
11.26:1
Next up lets create a horizontal row of paws that are equidistant from each other by some distance. But before we do this though we have to convert the paws dimensions from obsolete units to percentages relative to the container element. I think we have just figured out the paw width when we calculated the container height. So similarly let’s figure out what percent of the container height is 60 pixels.
Well, since we want two paws in the height, it's obvious that the paw height is gonna be 50%. But let's prove this mathematically using the aspect ratio.
Divide 60 by the container height(ch):
60 / ch
Note that the container height is determined by the aspect ratio. So how are we gonna be able to find the height in pixels?
It’s quite easy! Let’s write the definition of the ratio:
ratio = width / height
solve for the height:
height = width / ratio
And since we got the ratio for the container is already defined and giving that the width is 1350px at a certain screen size:
height = 1350 / 11.26
And the height for 1350-pixel-wide element:
ch = 119.89
And then the paw's height is:
ph = (60 / ch) * 100
Simplify:
ph = 50%
And then let’s save the result of each one as predefined variables:
const PAW_HEIGHT = 50%;
const PAW_WIDTH = 4.44%;
That will result in a perfect square that fits any screen size.
Create a function, name it generatePaws or anything, and then let it expect a width and height props;
// utils/generatePaws.js
export default function generatePaws({ width, height }) {}
Take a moment and think how many paws should we end up seeing in the progress bar? Take your time…
Well, we don’t want to guess that right? But we want math to do this for us instead. So if we just divide 100 by the width of the paw which I think we figured out earlier, we would get how many paws are going to fit horizontally in the progress bar:
100 / 4.44
Rounding up this fraction, will result in 22 paws:
const amount = Math.round(100 / width);
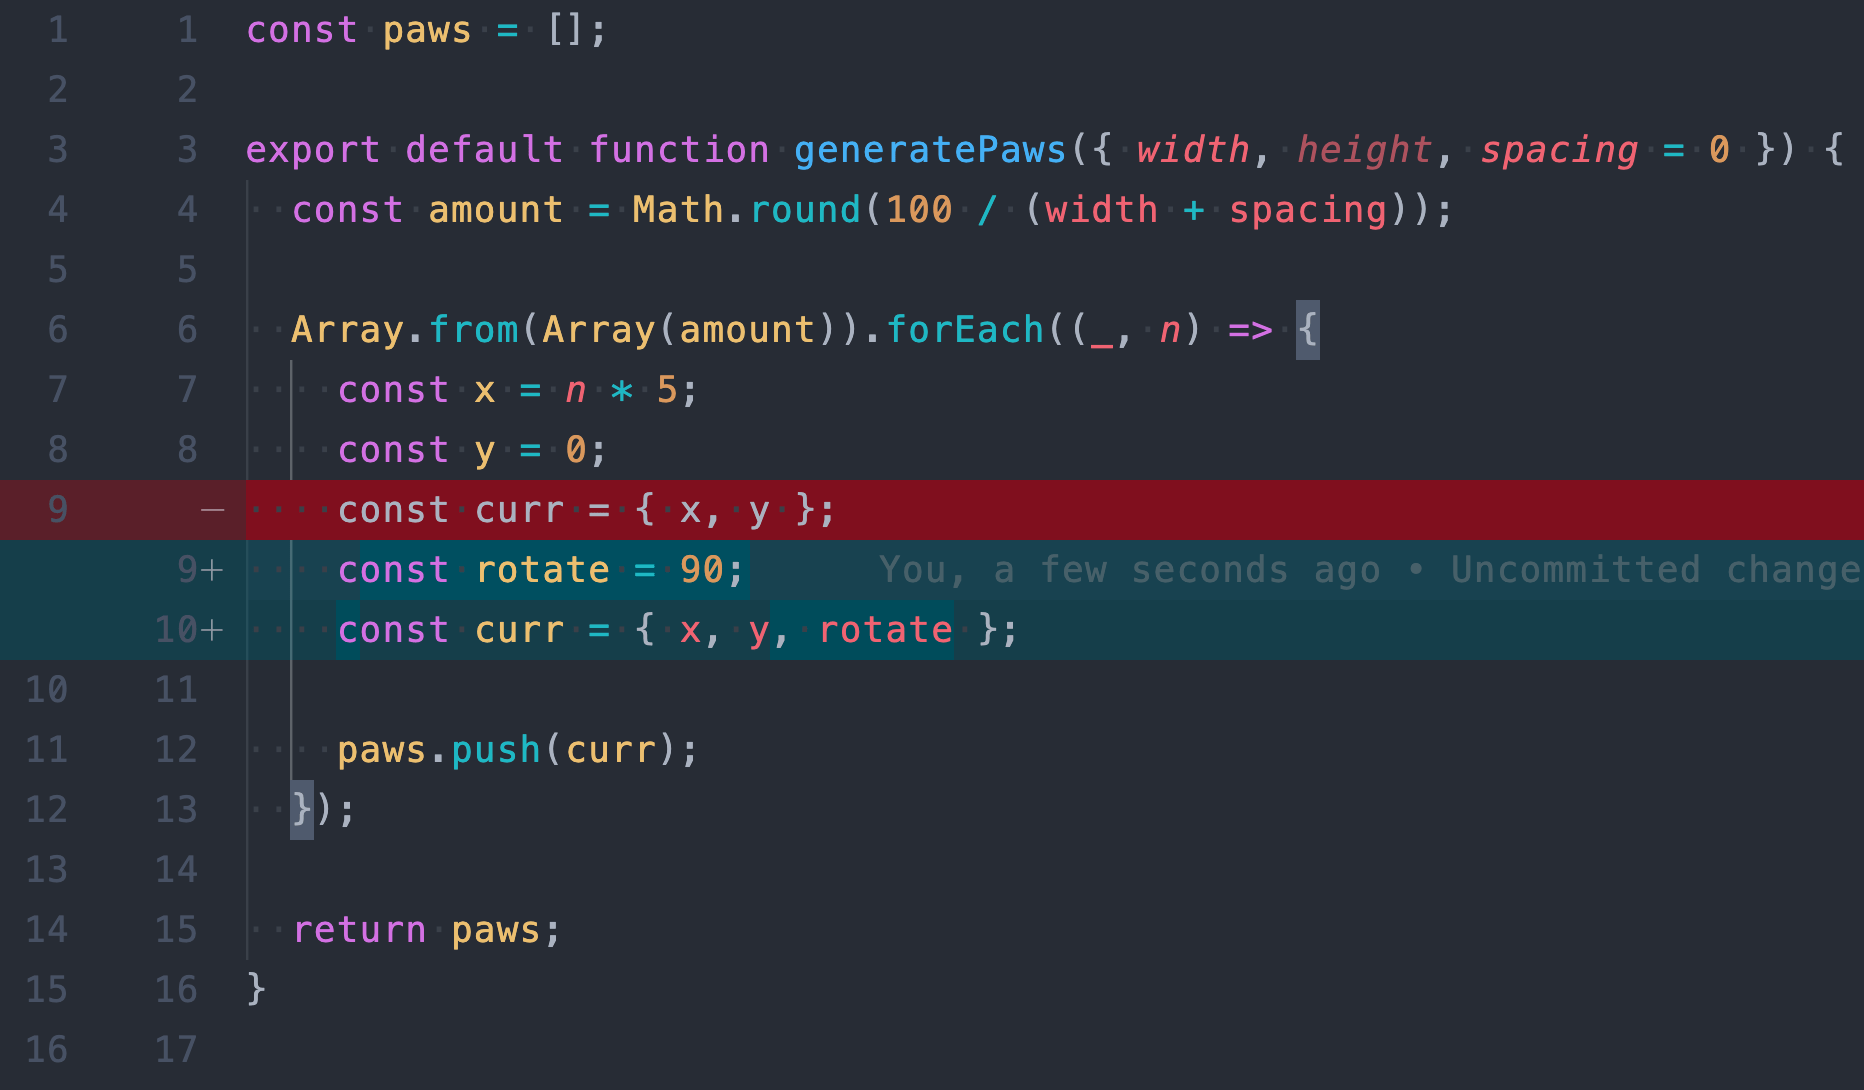
Make the generatePaws function Iterate a loop for the given amount number of times. And for each Iteration, return an object with an x and y properties and add it to an array. x represents stepping forward along the x axes while y is just how far those paws are from the top:
// utils/generatePaws.js
export default generatePaws({ width, height }) => {
 const amount = Math.round(100 / width);

 Array.from(Array(amount)).forEach((_, n) => {
   const x = n * width;
   const y = 0;
   const curr = { x, y: y, rotate: 90 };

   paws.push(curr);
 });
Cool! We have just created the paws generator function. Go ahead and start generating paws by executing the function and attach each generated paw item’s x and y values to the paw icon. You can do that!
// progressbar.js
import generatePaw from 'utils/generatePaws';

const paws = generatePaws({ width: 4.44, height: 50 });
Cool! Now the result looks like this:

Paws are perfectly displayed in a horizontal line but there is no spacing between them. So let's add some spacing. Here I think it’s fine to guess. Let’s go with 0.55% for the spacing and add it to the number we are diving by, which is 4.44:
100 / (4.44 + 0.55)
the amount would look like this:
const amount = Math.round(100 / (width + spacing));
And we end up with following result:

Next, we want it to look like a cute kitty is walking from left of the screen to the right leaving its adorable little paw prints behind. To do this we only need to rotate each single paw by 90 degrees.

Cool! But these paw steps don’t look like they are made by a four legged kitty. But rather they look like they are made by a one legged creature with cat-like paw jumping in a straight line.
I think a checker pattern would be great to more realistically simulate a walking four-legged cat's paw steps. As you see in the picture below, for all the black boxes we can replace them by a paw. Lets do that.

We can do this by saying, if the current paw’s index is even, move it vertically by its height.
To get this working we need a couple things, the paw height which I think is available, and a way to determine if the current paw’s index is even or odd. For this one, I think we are going to need something called The remainder operator.
The Remainder operator(%):
In math, the remainder is when a number can’t be divided equally into a set of groups and we have something leftover. Like if you want to distribute 11 kitties amongst 5 kids, each kid could have 2 kitties but there would be one leftover because 11 does not evenly divide by 5. It leaves us with a remainder of 1.
Essentially this gives us the ability to limit the range of a number x from 0 up to a number y: (x % y). For example if we want to get the remainder of the fraction n/3 (n % 3), it would give us a value only between 0 and 2 for any number n.
In our case we only want a number between 0 and 1. As you might have guessed we would use n % 2. Using this I can determine which paw is the right and which one is the left paw.
Inside the forEach’s callback function create a new const name it isRightPaw and assign it the value of the remainder n % 2. And if the remainder is 1 set the y value to the paw's height and if it's 0 set y to 0.
const isRightPaw = n % 2;
const y = isRightPaw ? size : 0;
And we are going to end up with the following nice result:

So far so good! But this looks like it's too machine perfect. We want it to look less like a perfect checker pattern because this almost sucks the life out of our paw steps progress bar. As you can see, each paw comes right in front of the next paw horizontally in the exact same distance. Now let’s try to randomize the distance between paws along the x axes to make it look less determined and get it to be not so robotic.
So Instead of making paws step forward by exactly 0.55% from each other, we can say we want the distance to take any random number between a min and a max.
As we go about front-end development, we often find it useful to generate random numbers. Lucky for us, JavaScript already has an awesome method that does just that. It generates random numbers! Yaay!
Math.random
This method returns a random floating point between 0 and 1. It can include 0 but it’s always less than one.
Here is the mathematical representation:
0 ≤ random <1
This method only gives us a range between 0 and 1. But we want more than that. Well realistically, we want a random value between 0.35% and somewhere around 0.65%.
So our goal formula is a value r between 0 and 1 which is exactly what we get from the random function:
0 ≤ r < 1
And let a number n greater than 0.35 and less than 0.65 which is the range we are aiming for:
0.35 ≤ n < 0.65
Now let’s write a formula for r in terms of n.
Remember when solving this type of compound inequality, we have to work on all parts at the same time. So let’s start by subtracting 0.35 everywhere:
0.35 - 0.35 ≤ n - 0.35 < 0.65 - 0.35
Simplify:
0 ≤ n - 0.35 < 0.3
And then divide by 0.3 to make sure we get 0 at the far left side and 1 at the far right side so we can resemble our goal formula:
0 / 0.3 ≤ (n -
0.35)
Simplify again:
0 ≤ (n -
0.35) / 0.3
Nice! Now we have the formula for r in terms of n.
Now, let's set r to equal the solution since they both belong to the same range:
r = (
n - 0.35) / 0.3
Solve for n:
n = (
r * 0.3) + 0.35
And when converting this result to code we get this:
const n = Math.random() * 0.3 + 0.35;
Awesome, now if we multiply this result by the index n, and assign it to the constant x:
const MIN_SPACING = 0.35;
const MAX_SPACING = 0.65;

const x = n * (width + MIN_SIZE + Math.random() * (MAX_SIZE - MIN_SIZE));
We will see the paws are randomly stepping forward:

I know! Paws are colliding and that is a problem. Because with the logic we wrote, it’s possible for the paws to collide. But before we resolve this, first let's do the same for the y value to randomize along the y axes. To make it even more realistic, we can allow all paws’ y values to collide meaning that one paw can appear partially in front of the previous paw:
But we can’t do this if we have a container with a height equal to the paw’s height times 2. Meaning that it only has room for two paws vertically. To solve this, we have to increase the container’s height just enough to let paws randomly move apart from each other and get close to each other. let’s illustrate this:
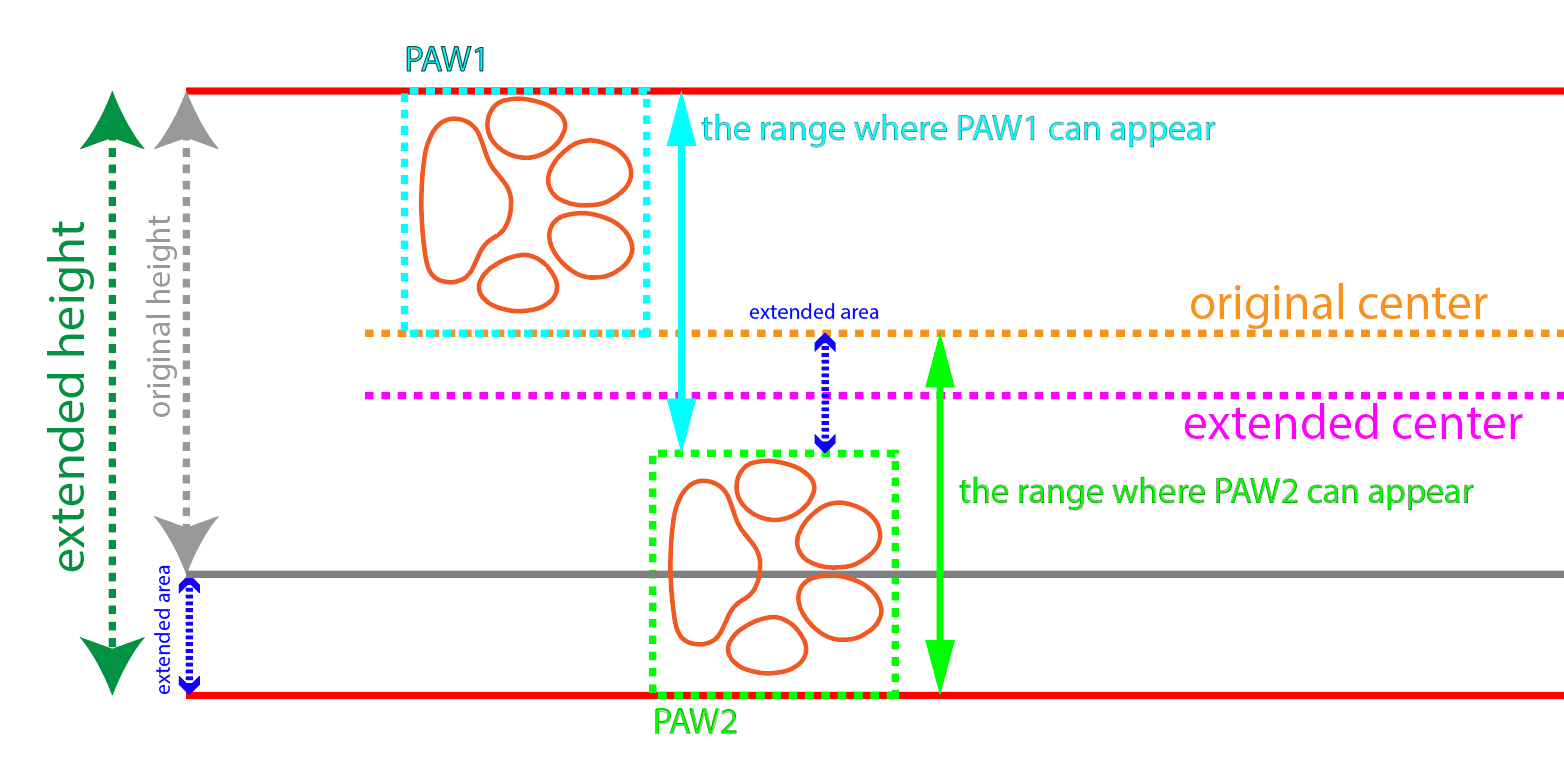
As you can see, we have increased the height by half the height of the paw. Which is the distance how far two paws can vertically collide.
Well before we calculate the paws' new y value, we need to do two things first:
- recalculate the container height.
- recalculate the paws height.
Let’s find out the container height:
h = ((60 / cw) * 100) * 2.5
Update the container's padding-top with the result of the new height:
padding-top: 11.11%;
Similar to how we do it before, let's recalculate the new paw height:
aspect ratio:
container height:
paw height:
Now since we got both the container height and paw height both recalculated let's resume our discussion about the new paw's y value:
- The y value of the left paw, which is the one outlined with light blue, should be a random number between 0 as a minimum and the half of the paw’s height as a maximum.
- The y value of the right paw which is the one outlined in light green should be a random number between the original center or paw height as a minimum, and the paw height plus half the size or 100 minus the paw height as a maximum.
Let’s see how it’s done in code. But first, let’s see the mathematical representation for both left and right paws:
0 ≤ y1 < height / 2
height ≤ y2 < height + height / 2
Similar to how we did it back when we horizontally randomized the spacing between paws, let’s do it again and write two formulas:
- A formula for a number r less than 1 and greater than 0 in terms of y1.
- A formula for a number r less than 1 and greater than 0 in terms of y2.
And if you solve for both y1 and y2, you would end up with something like the following code:
const y1 = Math.random() * (height / 2);
const y2 = Math.random() * (height / 2) + height;
Combining them together we get one expression for every paw:
const y = Math.random() * (height / 2) + (isRightPaw ? height : 0);
We get this result:

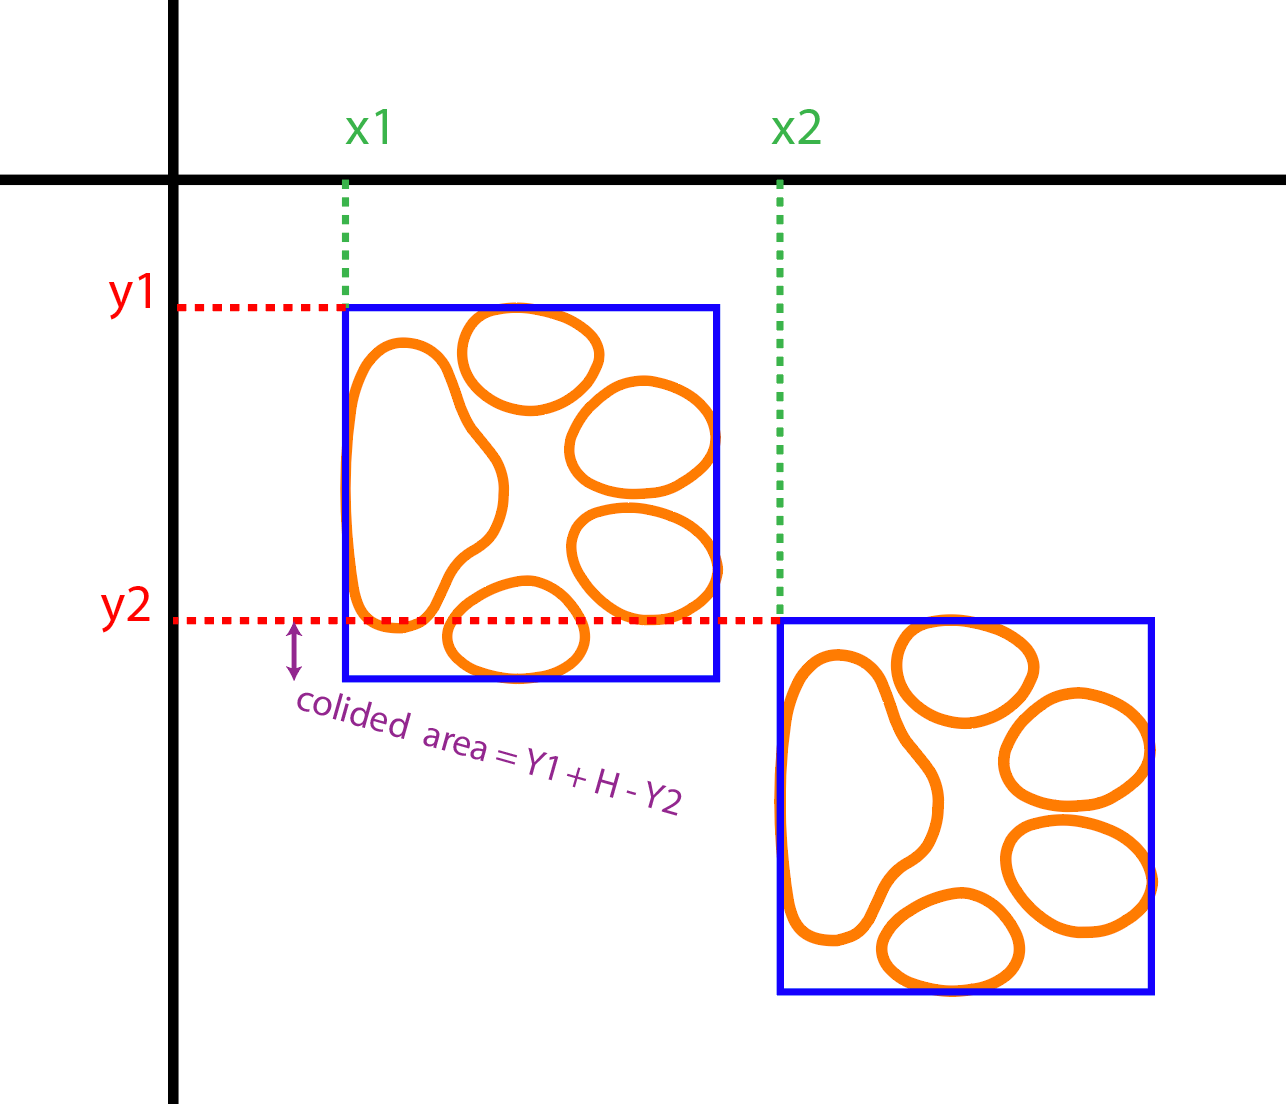
Now it's time to prevent paws from colliding. One easy way to achieve this is by saying if the displacement between the previous paw’s y and the current paw’y is less than the height of the paw, horizontally move the current paw right in front of the previous paw.
const prev = n > 0 ? paws[n - 1] : null; // previous paw
const collided =
  prev && Math.abs(y - prev.y) < height + 0.3 && Math.abs(prev.x + width) > x;
And then change the definition of x to the following and you will never see them collide again:
const curr = { x: collided ? prev.x + width : x };

Prefect! Now they look a lot more realistic. But it’s still up to you about how far you want to randomize it. And if you want it to just look like a perfect checker pattern it would look pretty fine as well.
Now let’s work on paws rotations. I am not an expert with the anatomy of cats but I believe if you look closer at a cat’s leg we should find a joint point between the leg and the foot. Which is the ankle area. This ankle I guess allows the foot to tilt to the side a bit and also turn inwards and outwards. Which means it’s possible for cats to produce random rotations on the level of the paw while walking. So far all the paws’ x axes are perfectly aligned, meaning there is no rotation. Let’s make them rotate.
We already have the paw angle initially increased by 90 degrees. Now we can say let the paw randomly take any angle between -25 and 25 degrees. Which is a range of 50 degrees in total:
-25 ≤ a < 25
Again writing a formula for a number r which represents Math.random() in terms of a:
0 ≤ (a + 25) / 50 < 1
And then turn it to JavaScript code:
const angle = 25;
const rorate = Math.random() * (angle * 2) - angle;
And finally adding the initial degrees:
const rotate = Math.random() * (degree * 2) - degree + initialDegree;
And here we we go:

It looks great! Isn’t it?
Progress
I think that is it for displaying the paws. Now we are going to make each individual paw contribute in showing an overall percentage across the width. Technically we should calculate the difference between the completion percentage and the paw’s x values. And if a paw’s x value happens to be less than the completion percentage, we fill that paw with its color.
But before we do that though I want to mention that the paw is in SVG and for the moment I am only rendering them as a solid stroke as you have seen through the previous examples.
Now we might say if the difference is greater than 0 fill the paw:
const diff = completionPercentage - paw.x

return (
  <svg>
    <path
      stroke={color}
      fill={diff > 0 && color}
      d=”..”
    />
  </svg>
)

That is neat! But some people might want to be more accurate with percentages and they might want to enable the ability to partially fill the paw. Doing this involves doing couple more things:
- Duplicate the paw path and make the new one as a clip path.
- Add a rectangle inside the paw svg file and make the width increase from 0 to 100% and clip it according to the clip path.
Clip Path definition from MDN:
A clipping path restricts the region to which paint can be applied. Conceptually, parts of the drawing that lie outside of the region bounded by the clipping path are not drawn.
In our case this means that the parts of the rectangle inside the shape are visible. And anything else is not. And that is exactly what we need for partially filling the paw. Great!
As you see in the GIF above, the embedded rectangle in the white paw on the right is not clipped while the orange rectangle on the left is actually clipped.
How are we going to determine the percentage we need to give for each paw?
First, we should be aware that the percentage is based on the element’s parent. Meaning that percentage of the rectangle’s width is going to be measured relative to the containing svg. So we need to figure out how much is the diff out of the paw width.
To get the percent, we just divide the diff by paw width:
diff / width
And then multiply the result by a 100:
diff / width * 100
We get this result:
function Icon() {
  const percentage = (diff * 100) / PAW_WIDTH;

  return  (
    <svg>
      ...
      <g clipPath="awesome-clip">
        <rect
          fill={color}
          style={{
            width: `${percentage}%`;
          }}
        />
      </g>
      ...
    </svg>
  )
}
But wait, since the diff represents the difference between a paw’s x value and the completion percentage, it could be a huge relative number. For instance if we are measuring the difference of the first paw and the completion percentage of a 100, then the difference is going to be almost the full width of the progress bar. And mathematically, this is totally valid and there is no restriction and percentages may take on other values.
But values greater than 100 and less than 0 don’t suit our needs, for this we can set boundaries to our result percentage using Javascript’s Math.max() and Math.min():
const percentage = Math.min(Math.max((diff * 100) / PAW_WIDTH, 0), 100);
Cool! Let’s see how things are looking now:

As you might have noticed, partially filled paws are looking weird! And that is because the paw is rotated and it’s obvious that the child rectangle would inherit the rotation transformation. And to prevent this, we have to apply the reverse transformation to the child rectangle:
function Icon({ rotate }) {
  return  (
    <svg>
      ...
      <g clipPath="awesome-clip">
        <rect
          fill={color}
          style={{
            transform: `${`rotate(${rotate * -1}deg)`}`;
          }}
        />
      </g>
      ...
    </svg>
  )
}
With that, we should now see the rectangles are vertically aligned along the cross axis:

Finally, the final source code for the progress bar should look like this:
https://github.com/obytes/pawsteps-progressbar
Enjoy! And see you next time.