An introduction to infrastructure as code using Terraform (part 1).
What's Infrastructure as Code (IAC)?
First of all, before starting our article titled "An introduction to infrastructure as code using Terraform" which will be the first part of series of articles about Terraform, we need to understand what is infrastructure as code and how it is different from the classic way. Infrastructure as Code comes to replace the old way which is about manual processes of provisioning and managing your infrastructure, these manual processes have certain disadvantages (as explained in this AWS-Whitepaper), including:
- Higher cost because they require human capital that could otherwise go toward more important business needs.
- Inconsistency due to human error, leading to deviations from configuration standards.
- Lack of agility by limiting the speed at which your organization can release new versions of services in response to customer needs and market drivers.
- Difficulty in attaining and maintaining compliance with corporate or industry standards due to the absence of repeatable processes.
IAC addresses these deficiencies by bringing automation to the provisioning process in a repeatable and consistent manner using configuration files. Infrastructure as Code treats these configuration files as software code. When your infrastructure is defined as code, you will be able to use a wide variety of software engineering practices to radically improve your delivery process, including:
- Self-service: The magic of deployment is no longer known only by the group that manages the infra (Sysadmins, DevOps ...) but Developers can also take care of their own applications deployments from its start to the end.
- Speed and safety: Once you have the deployment process automated then it will become faster to deploy changes to your infrastructure, usually we use CI/CD tools to automate the process, this will make the process more consistent, more repeatable and not prone to manual error.
- Documentation: Since your infrastructure is presented as a code that acts as a documentation for your infra, allowing everyone in the organization to understand how things work.
- Version control: You can store your IAC source files in version control, which means the entire history of your infrastructure changes is now captured in the commit log.
- Validation: If the state of your infrastructure is defined in code, then for every single change, you can perform a code review, run a suite of automated tests, and pass the code through static analysis tools, all practices that are known to significantly reduce the chance of defects.
- Reuse: Your infrastructure as code means that you can easily split and package your infrastructure into reusable modules so that instead of doing every deployment for every product in every environment from scratch, you can build on top of known, documented, battle-tested pieces.
Now that we have explained what IAC is and what are the benefits of it, we will discuss next the tool we use in Obytes to practice IAC.
Terraform
Terraform as explained in the official-docs is a tool for building, changing, and versioning infrastructure safely and efficiently. it will let you manage your infrastructure as code and create different environments like production, QA and staging with an identical configuration in an easy and fast way.
In Obytes we use Terraform to manage multiple infrastructures for each project and Terraform made the job easy for us because we can create our own re-usable Terraform modules or use the open source modules from Terraform Module Registry and use them across different projects. In next section, we will go through a basic example on how we can create a single instance in AWS and pass to it a bash script at boot time to install and configure Nginx.
Install Terraform
You can follow the instructions to install Terraform depending on your operating system, once that is done you can verify the installation :
$ terraform --version
Terraform v0.11.9
Terraform supports a wide range of cloud providers including (AWS, Azure, Google Cloud ...) in this tutorial we use AWS and that requires you to register and create an AWS account, we also recommend that you setup awscli which is the command line to interact with AWS different services via its API, having awscli configured will enable you to create different profiles that we will use next to configure Terraform and make it provision resources in your AWS account. There are other ways to configure Terraform with your AWS account, you can check them here.
Thereafter we suppose that you are using the default profile found in $HOME/.aws/credentials after setting up the awscli tool.
Deploy the server
Terraform code is written in HCL in which Terraform files have the .tf extension. It is a declarative language, so your goal is to describe the infrastructure you want, and Terraform will handle the creation.
We want Terraform to communicate with your AWS account via the profile you configured in the previous section, and this is done using something called providers. Create a file called "main.tf" and put the following code in it:
provider "aws" {
  region  = "us-east-1"
  profile = "default"
}
This tells Terraform that we are going to use the AWS provider and that we wish to deploy our infrastructure in the "us-east-1" region. The most important thing you'll configure with Terraform are resources. Resources are a component of your infrastructure (such as servers, databases, and load balancers ...), next, we will create our server (EC2 instance in AWS lingo), add the code below to your "main.tf" file :
data "template_file" "user_data" {
  template = "${file("${path.module}/user-data.tpl")}"
}

resource "aws_instance" "example" {
  ami = "ami-0c11a0129f63fb571"
  instance_type = "t2.micro"
  user_data     = "${data.template_file.user_data.rendered}"
  key_name = "test"

  tags {
    Name = "terraform-example"
  }
}
The first thing we do is that we use terraform Template Provider to pass to our instance a script or user data (in AWS lingo) to be executed, the script will install and it looks like this :
#!/bin/bash
apt-get update && apt-get install -y nginx
We could pass the command that installs Nginx directly to the Terraform resource, like this :
user_data = <<-EOF
#!/bin/bash
apt-get update && apt-get install -y nginx
EOF
But I chose to work with Terraform template files to let you know about it, because they are very useful when your script depends on some information from Terraform resources, then you can just render them and pass them to the script via template files, for example i could configure Nginx to render a page where it shows the Terraform configuration that was used to create the instance, I can pass in the AMI id, the instance type ... we kept this demo basic for the sake of simplicity, maybe we can talk about Terraform template rendering in one of our future articles ;D
One thing to mention, user-data scripts get executed using root user, so you don't need to mention sudo at the beginning of every command that requires root privileges.
After we set our script via template files, we tell Terraform to create an AWS instance named example using the aws_instance resource, the arguments we are passing :
- ami: The Amazon Machine Image to run on the instance. the AMI we are using is for Ubuntu 16.04 LTS in the us-east-1 region.
- instance_type: The type of EC2 Instance to run, AWS has a large selection of instance types that you can check here
- user_data: The user data (our script) to provide when launching the instance.
- key_name: The key name of the Key Pair to use for the instance, which will be used to ssh to the instance. I have already created one
testfor our demo, but you can create yours by following the instructions in key pair. - tags: to set the instance name.
In your terminal, switch to the directory where your main.tf is and run this command terraform plan :
$ terraform plan
An execution plan has been generated and is shown below.
Resource actions are indicated with the following symbols:
  + create

Terraform will perform the following actions:

  + aws_instance.example
      id:                           <computed>
      ami:                          "ami-059eeca93cf09eebd"
      associate_public_ip_address:  <computed>
      availability_zone:            <computed>
      ebs_block_device.#:           <computed>
      ephemeral_block_device.#:     <computed>
      get_password_data:            "false"
      instance_state:               <computed>
      instance_type:                "t2.micro"
      ipv6_address_count:           <computed>
      ipv6_addresses.#:             <computed>
      key_name:                     "test"
      network_interface.#:          <computed>
      network_interface_id:         <computed>
      password_data:                <computed>
      placement_group:              <computed>
      primary_network_interface_id: <computed>
      private_dns:                  <computed>
      private_ip:                   <computed>
      public_dns:                   <computed>
      public_ip:                    <computed>
      root_block_device.#:          <computed>
      security_groups.#:            <computed>
      source_dest_check:            "true"
      subnet_id:                    <computed>
      tenancy:                      <computed>
      user_data:                    "06f151e41c9b5d70bd6b14bb2039e60288813ecc"
      volume_tags.%:                <computed>
      vpc_security_group_ids.#:     <computed>


Plan: 1 to add, 0 to change, 0 to destroy.
}
The command will show you what terraform will actually do in your infrastructure, in our case it will create one resource aws_instance.example which is our instance where the app is going to be deployed.
After we confirm that this is the change that we want, we can then hit terraform apply to let terraform creates the resource for us :
aws_instance.example: Creating...
  ami:                          "" => "ami-059eeca93cf09eebd"
  associate_public_ip_address:  "" => "<computed>"
  availability_zone:            "" => "<computed>"
  ebs_block_device.#:           "" => "<computed>"
  ephemeral_block_device.#:     "" => "<computed>"
  get_password_data:            "" => "false"
  instance_state:               "" => "<computed>"
  instance_type:                "" => "t2.micro"
  ipv6_address_count:           "" => "<computed>"
  ipv6_addresses.#:             "" => "<computed>"
  key_name:                     "" => "test"
  network_interface.#:          "" => "<computed>"
  network_interface_id:         "" => "<computed>"
  password_data:                "" => "<computed>"
  placement_group:              "" => "<computed>"
  primary_network_interface_id: "" => "<computed>"
  private_dns:                  "" => "<computed>"
  private_ip:                   "" => "<computed>"
  public_dns:                   "" => "<computed>"
  public_ip:                    "" => "<computed>"
  root_block_device.#:          "" => "<computed>"
  security_groups.#:            "" => "<computed>"
  source_dest_check:            "" => "true"
  subnet_id:                    "" => "<computed>"
  tenancy:                      "" => "<computed>"
  user_data:                    "" => "06f151e41c9b5d70bd6b14bb2039e60288813ecc"
  volume_tags.%:                "" => "<computed>"
  vpc_security_group_ids.#:     "" => "<computed>"
aws_instance.example: Still creating... (10s elapsed)
aws_instance.example: Still creating... (20s elapsed)
aws_instance.example: Still creating... (30s elapsed)
aws_instance.example: Creation complete after 31s (ID: i-07d8ed9e2aa89fd9a)

Apply complete! Resources: 1 added, 0 changed, 0 destroyed.
Cool, we just deployed our first AWS instance using Terraform! note if we went with the classic way without using Terraform, you will notice that this provisioning of a new instance will require multiple clicks from you in the console and as a result, more time will be spent.
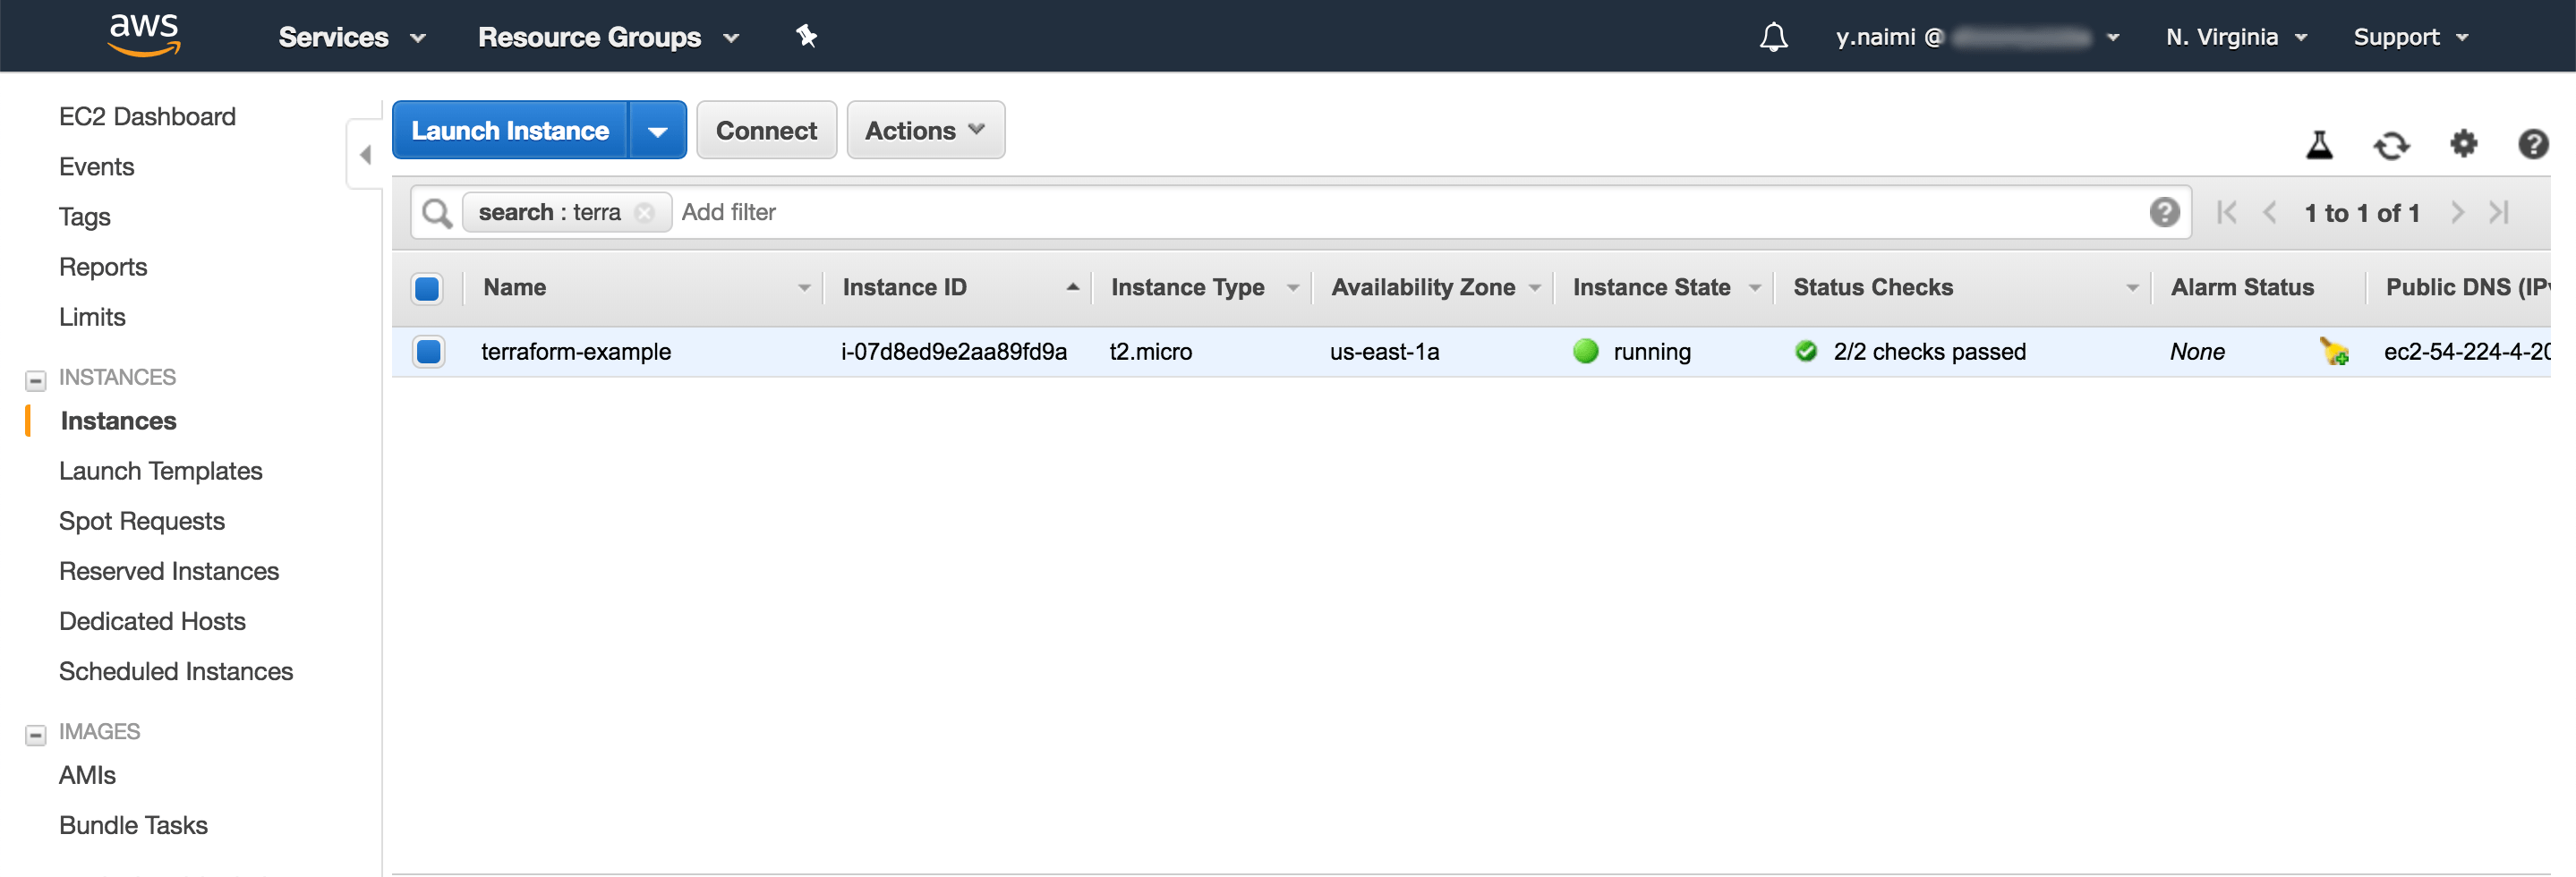
You can verify the instance from EC2 console
Now if you try to visit the instance public IP that you can get from the EC2 console, you might not get the famous "Welcome to Nginx!" page, don't worry, we have a fix for that, in AWS there is something called security group which acts as a firewall to control the traffic for your instances in Amazon Cloud, in our example we didn't specify any security group, as a result, we can't access Nginx on port 80, to do so Terraform has a resource for that, in your main.tf add the resource for the security group :
resource "aws_security_group" "instance" {
  name = "terraform-example-instance"
  ingress {
    from_port = 8080
    to_port = 8080
    protocol = "tcp"
    cidr_blocks = ["0.0.0.0/0"]
  }
}
The resource above will create the security group which allows incoming TCP requests on port 8080 from the CIDR block 0.0.0.0/0. CIDR blocks is a way to specify IP address ranges. The CIDR block 0.0.0.0/0 is an IP address range that includes all possible IP addresses, so the security group above allows incoming requests on port 8080 from any IP.
In Terraform, every resource has attributes that you can reference using the same syntax as interpolation. You can find the list of attributes in the documentation for each resource. For example, the aws_security_group attributes include the ID of the security group, which you can reference in the EC2 Instance as follows:
vpc_security_group_ids = ["${aws_security_group.instance.id}"]
The syntax is:
${TYPE.NAME.ATTRIBUTE}
When one resource references another resource, you create an implicit dependency. Be careful of cyclic dependencies, where two resources depend on each other to be created, apply will fail in this case.
Let's test our work
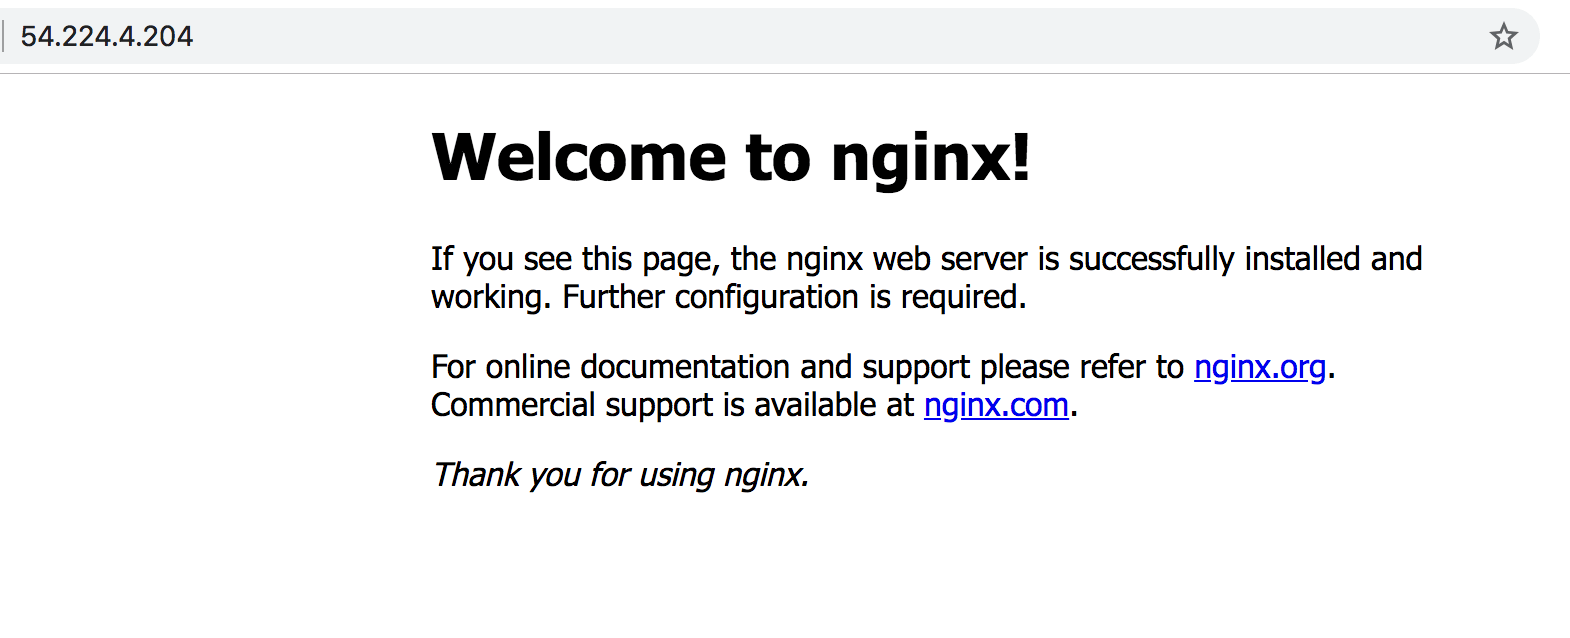
Now that you have the server up and Nginx configured, and the correct security group in place, you can go ahead and visit the public IP of your instance, if all is good you will see the "Welcome to Nginx!" page :
Conclusion
In this article, we defined what is Infrastructure as code, and what are the benefits of using it, we went also through the basic of Terraform and how you can use it to manage your infrastructure as code. Terraform makes the job easy with its declarative language, reusable modules, its planning strategy where it executes a dry run to the configuration and shows the changes to be made to infrastructure even before making the actual changes. Variables, interpolation, and dependencies allow you to keep code DRY and efficient. In the next parts of the series, we will go deeper in Terraform and explain some advanced topics.